Showing posts with label Stamping Bella. Show all posts

Sunday, August 19, 2018

Faith Forward Card with Copics, Alcohol Inks and Stenciling

As a Christ follower, I am quite excited about the increasing availability of faith based stamp sets.  These sentiments go with so many other stamp sets in my collection that the hard part is narrowing it down to which one I'm going to use next.  In this card, I started with the sentiment.  I ordered the Janes Doodles Bless Your Heart stamp set around the same time as ordering the Stamping Bella Butterfly Girl Briana and they happened to be sitting together on my studio table, putting together my card for me.  Adding the alcohol ink wings (inspired by Marker Geek) and gold stenciling brought it together perfectly.  While there are several techniques in this card, they are simple to do and add a lot of texture, dimension and interest.  Here is the link to my video tutorial on my YouTube channel and my supplies are listed below.

Supplies:
Janes Doodles Bless Your Heart stamp set
Ink on 3 Blackout

Neenah Solar White 80lb cardstock
MISTI
Stamping Bella Butterfly Girl Brianna Bundle
Alexandra Renke Stencil Heart in the Middle
Ranger Alcohol Inks: Gunmetal, Teakwood, Indigo, Aqua, Pebble
Ranger Alcohol Ink Blending Solution
Glossy Cardstock
Creative Medium Embossing Paste in Metallic Gold
Inkadinkado Masking Paper
Copics:
Dress- BG11, 13, 15  Flowers- B28, BG02
Hair- E27, 29  Skin- E11, 13, 21; R20

I know I often say that I love my cards and this one is no exception.  It's so pretty and the sentiment is a foundation for me.  Like most other creatives, I don't share work I'm not happy with, so if you see it on my blog, YouTube or elsewhere, it's something I'm proud of and want to invite others to share my joy.

For Christs glory and much love,
Jasmine

Sunday, July 30, 2017

Under the Sea with a Distress Oxide Background

 Summer is beginning to wind down, but it's not over yet.  I've been playing with my Distress Oxide re-inkers to see what they can do and created a few backgrounds (here's the video with those).  Stamping Bella had a new release in the beginning of July with Mermaids, fishes and lots of other sea life which I couldn't resist.  Flipping through my backgrounds and going through some new stamps, these two just fit together like sun and sand.  I colored my images with Copic markers and created a Shaker card with elements on the inside and outside to create a bit more dimension.  If you are new to Copics or are interested in learning more about them, I highly recommend Sandy Allnock's Copic Jumpstart class at art-classes.com.  Here is the video tutorial on my YouTube channel and my supply list is below.

Supplies:
Stamping Bella Under the Sea sentiments
Stamping Bella Tiny Townie Mermaid S&D
Stamping Bella Under the Sea creatures S&D
Memento Tuxedo Black ink
Strathmore Bristol Smooth cardstock
Black cardstock
MISTI Original
Lawn Fawn Stitched Rectangle dies (2 largest)
Hero Arts Acetate
3M Foam Tape
Vellum
Stick-It Sheet Adhesive
Versamark
Ranger Black Sparkle embossing powder
Oval die
Scor-tape
Little Things Caribbean Dream Sequin mix 
Spectrum Noir Clear Sparkle Pen
Matte Medium
Copic Markers
Mermaid:
  • Hair: E08, 35; R59
  • Tail: B16, 24, 28, 69
  • Top: Y17, 35
  • Skin: E51, 33, 35; R20
  • Flower: BV11, 01, V05
  • Conch: RV42, 51
Treasure Chest: E23, 25, 27; C0, 2, 4; Y35, 17; RV000
Turtle: YG17, 67; E23, YG99, G94
Fish: B24, 28; Y11, 17; RV21, 25; V04, 05, 09; BV01, 11, V04

Distress Oxide Ink Background
  • Salty Ocean
  • Twisted Citron
  • Peacock Feathers


I had a lot of fun creating this card and I hope I've sparked your creativity as well.  Thanks for joining me.  As always, I'm happy to help if you have questions.  See you next time!

For His glory and much love,
Jasmine


Thursday, April 27, 2017

Shaker Cards Galore

Hello!  I'm back with a new shaker card menagerie.  We finished up with AWANA for the year this week and I wanted something to give to my kids that was fun and personalized.  What's better than a shaker with your name on it?  I did each one a little different with their favorite colors in mind and did my best to keep the boys' cards' as masculine as I could as they are definitely in that "pink is for girls" phase.  3 of them are moving on to youth group next year and we'll certainly miss them.  

If you aren't familiar with AWANA, it's a program that spans for 4 years old - 6th grade that teaches kids about the Bible and Jesus at an age appropriate level.  I work with the 5th and 6th graders and we have so much fun while making sure they know we are there for them and are a support system if/when they need it.  

I only filmed one card because the process is the same for each card; I only changed colors of ink and paper between the girls' and boys' cards.  Here's the link to the video on my YouTube channel and my supply list is below.

Supplies:
Boys Ink colors:
  • Lawn Fawn Lobster
  • Simon Says Stamp Orange Peel
  • LF Sunflower
  • SSS Fern
  • LF Fish Tank
  • LF Sugarplum
 Girls Ink colors:
  • LF Carrot
  • LF Sunflower
  • LF Jalepeno
  • LF Peacock
  • SSS Island Blue
  • LF Sugarplum
  • SSS Doll Pink
Stamping Bella Java Spills stamp set
My Favorite Things Wonky Stitches dies
Lawn Fawn Stitched Rectangle dies
Bristol Smooth cardstock
DCWV Shimmer, Foiled and Golds cardstock stacks
Concord & 9th Double Cut Alphabet dies
Stick-It sheet adhesive
Ranger Matte Medium
Little Things Jewels 
Littel Things Sequin mixes 
  • Lucky Dip Purple Paradise
  • Misty Rainbow
  • Deep Fuchsia
Scor-tape
Hero Arts Acetate sheets
3M Foam tape


 Thanks for joining me today guys!  See you next time.

Much love,
Jasmine


Saturday, February 4, 2017

Sweet Valentine Shaker with Stamping Bella

 Happy February!  Todays project is along a Valentines Day line, but versatile enough for birthdays, thinking of you, encouragement or sympathy.  This is the "I Heart You" stamp set from Stamping Bella and I bought it because it reminded me of my little niece Vivi, who's 2 with such a vivacious personality.  I didn't care for the way I colored the balloon on the image, so I used a heart die to cut it out and turn it into a shaker window heart balloon that Elly is holding.  Any heart die will work here since we're using the negative rather than the heart die cut itself.  So sweet!

Here is the link to the video on my YouTube channel of you want to see how I created this project from start to finish.  My supply list is below.

Supplies:
Stamping Bella I Heart You
Bristol cardstock
Memento Tuxedo Black ink
Versamark
Copics: Elephant C00, 0, 2, 3, 5, 6; RV10
Skirt: V01, 25  Outline: BG10
Spectrum Noir  Clear Sparkle Pen
Recollections Fuchsia glitter paper
DCWV Silver glitter paper
Lawn Fawn Stitched Rectangle die
Lawn Fawn Stitched Square die
Lawn Fawn Stitched Heart die 
SSS Cotton Candy cardstock
Ranger Liquid Platinum embossing powder
Hero Arts Acetate
Neenah 110 lb cardbase
3M Foam tape
Scor-tape 1/4" and 1/2"

If you have trouble with shakers, hopefully this will help.  If not, I'd be happy to answer any questions.  Thanks for stopping by and don't forget to subscribe!

Much love,
Jasmine


Monday, December 12, 2016

Handmade Christmas Series 2016: Card 8 Watercolor Skating Rudy

Merry Christmas and welcome!  Todays project is the eighth in my series for 2016 and starts off with this adorable Rudolph the Skating Reindeer by Stamping Bella.  I die cut my watercolor paper with a stitched circle die and stamped the image in Archival ink because it's a waterproof ink and I used watercolors to paint in the image.  To get a straight edge for the ice he's skating on, I laid down painters tape so that one hoof is just touching the ice.  The background is a large sheet (9x12 inches) that I colored using spray inks and cut down to card size.  I ran the panel through my big shot with a stitched rectangle die to give it a finished edge.  After heat embossing the sentiment, I added a few enamel dots to complete the card.  Here's the link to the video tutorial on my YouTube channel if you'd like to see how I made it from start to finish and my supply list is below.

Supplies:
Stamping Bella Rudolph the Skating Reindeer
Canson 140 lb watercolor paper
Lawn Fawn Stitch Circle and Rectangle dies
Archival Black ink
Memento Black ink
MISTI
Daniel Smith watercolors
Versamark
Brutus Monroe Icicle embossing powder
Signo White gel pen
Scor-tape
Virginia Turtle enamel dots

 Thanks for stopping by!  Be sure to let me know what you think and what you'd like to see next.  Merry Christmas to you and yours!

Much love,
Jasmine

Thursday, April 7, 2016

Moms Rock Hop with Laura's Loft

Welcome to my stop on our April Mothers Day Hop! We wanted to make this hop about honoring all the Moms in our lives.  I have two cards to share with you today and I know you'll love them as much as I do.  You should have landed here from Deana's blog, but if not Laura's blog is the place to start.  Don't forget to leave some love on each hop stop to be entered into the drawing for the impressive prize pack! We also have a killer 30% off sale on everything from 4/7/16 to 5/4/16 as well as $10 off a $75 purchase with the code $10off$75.  Lets get this show on the road!

 This set is "Amanda is Awesome" by Stamping Bella.  A little back story: I am the third of four children in my family and my older two siblings have always complained that not only am I the favorite, but also happen to have a high opinion of myself.  I don't believe I'm arrogant, but I am confident, stubborn and willful, so maybe that's where they're confused! LOL.  Anyway, the sentiment in this set is something I say to my Mom, so I had to have it and this is what I came up with.
Supplies:
Crafters Companion SN cardstock
Spectrum Noir markers
Distress Ink: Broken China (Set #6)
Lawn Fawn Stitched Rectangle dies
Tim Holtz Rays stencil
Faber-Castell Glass Bead Glitter Gel
Tim Holtz Distress Crayon - Mustard Seed (Set #3)
Lawn Fawn Perfectly Plaid 6x6 paper pack
VersaMark
WOW Black detail embossing powder
MISTI

I started by stamping the girl image onto a piece of SN cardstock using the MISTI, just in case I missed a spot and needed to restamp.  Using the third largest stitched rectangle die, I centered my image in the die, used a post it note to secure placement and ran it through the big shot.  I colored the image with SN markers and used a blending tool to buff some Broken China around the top and side edges.  This will add the to outdoor, sitting in the sunlight imagery.  I set it aside to allow the sky to dry; Distress Ink will reactivate with water and knowing I wanted to add stenciling over it, letting it dry thoroughly lessens the chance the texture medium will blend with the distress ink.  I let it dry for 10 minutes or so since it was a very light layer.  Using the MISTI again, dust the area with an anti-static powder bag or tool and stamp the sentiment in VersaMark.  Heat emboss with black embossing powder.  Next, run the patterned paper through the big shot with the largest of the stitched rectangle dies, adhere the focal layer to the plaid paper and arrange the stencil over the paper.  I masked off any areas I didn't want the texture medium with post-it tape.  Scribble the Distress Crayon into your craft mat and scoop about 1/2 tbsp of glitter bead gel onto it.  Blend together with a palette knife.  The crayon dissolves really easily and as you can see in the photos, the color stays strong.  Apply the gel over the stencil, smoothing in one direction and making an even layer.   Carefully remove the tape and stencil.  Set the card front to the side so it can dry and immediately wash the stencil and palette knife.  The medium will ruin your stencil and knife if allowed to dry on it.  I let mine dry overnight.  Mount the card front to a card base and you're card is complete!  This image is great for practicing shadows and contours.  Lawn Fawn's Perfectly Plaid paper pack is sold out in the shop, but Lawn Fawn's Beachside paper pack is just as versatile!

 
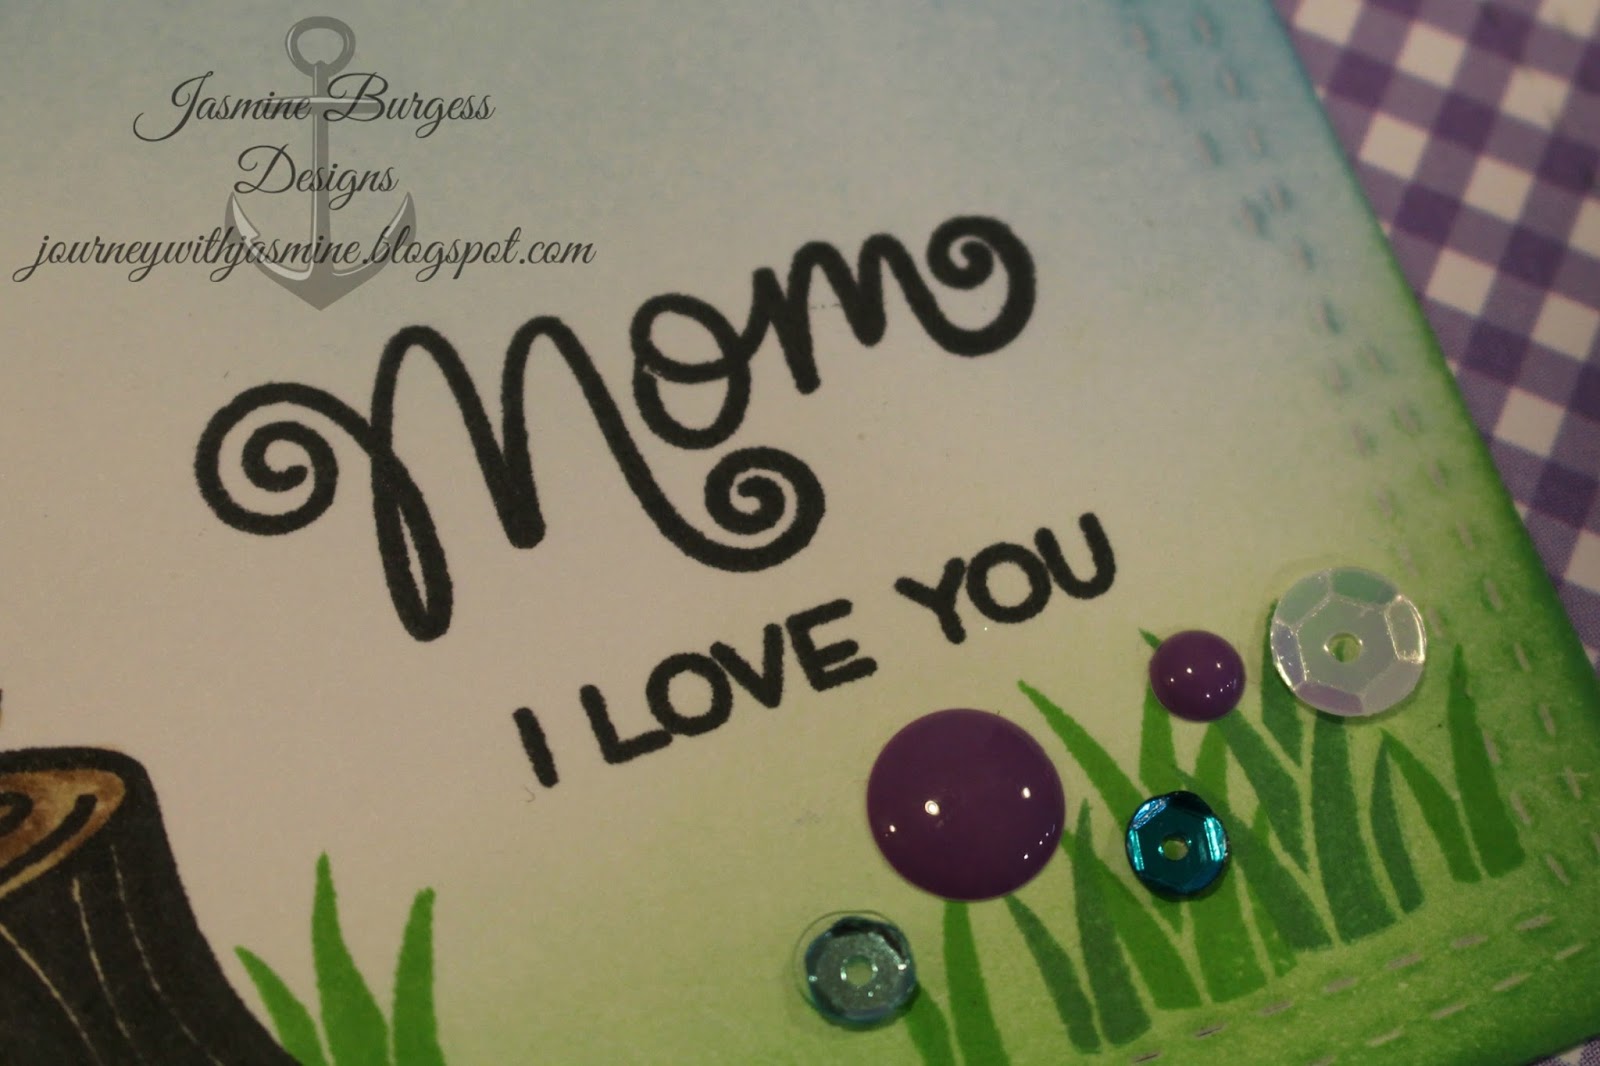
 This card features Lawn Fawn's Mom & Me stamp set.  It's so fun and sweet.  Perfect for a Mom of little ones, or to remind Mom of when she had little ones around.  I had my Moms favorite colors in mind when creating this.
Supplies:
Lawn Fawn Mom & Me
Avery Elle Wonky Stitches die set
Momento Tuxedo Black ink
SN Cardstock
Kraft cardbase
Lawn Fawn Jalapeño ink
SSS Fern ink
SN Markers
Distress Inks: Mowed Lawn (Set #2), Lucky Clover (Set #15), Broken China (Set #6) and Mermaid Lagoon (Set #13)
Doodlebug Kraft in Color: Kraft 6x6 pad
Doodlebug Enamel dots
Design Creative Bling: Laurens Bouquet
MISTI

I employed a bit of masking in this project, which probably sounds more intimidating that it is.  I wanted the Owl and chick image to be complete, so I stamped her first on the cardstock and again on a post it note.  Fussy cut out the image, leaving no border along the bottom of the owl.  Apply the mask to the Owl and stamp the wood stump slightly over the mask, so that she's standing on it.  I stamped it twice with my MISTI so that all the lines were nice and black.   When coloring with alcohol based markers, make sure to use a dye based black ink.  I always use Momento with my SN markers and have never had my images bleed.  I googled images of owls to get the coloring somewhat natural.  I also stamped the sentiment images twice and ran it through the big shot using the smaller of the Wonky Stitches frames.  After I finished coloring the images, I stamped the grass using LF Jalapeno and SSS Fern to give a variance in color and added grass behind the stump to ground it.  For the green at the bottom of the panel, I blended Mowed Lawn over the bottom third with Lucky Clover on the edges for a bit of depth.  For the sky, I started with Broken China and finished with Mermaid Lagoon.  I added Enamel Dots, Jewels and Sequins to look like flowers to complete the scene.  I ran the purple gingham paper through the big shot using the large Wonky Stitches frame, centered the focal panel over the purple panel and adhered it.  I finished up the card by mounting the layers to a kraft cardbase.


Thanks for coming to hang out for a bit today!  I hope you're enjoying everything you've seen so far and I know you'll have fun with what's coming up!  Robbie is your next stop on our Moms Rock hop.


Here's a complete list of all the hop stops:
Laura - http://www.lauralscott.com/moms-bouquet-hop/
Jasmine Burgess - You're here!

Now about that prize I mentioned...
Giveaway Entry:
There are several ways to enter and the more comments you make in the different social media platforms, the more entries you earn! It is required that you comment on each blog in the Hop.  After that, we encourage you to like and comment on our Facebook page, tag on our Instagram post and pin on Pinterest, as well as share on your own pages. The participant with the most entries wins the fabulous prize package! How cool is that!?!


You may be wondering what the prize is...

Sweet, huh!?! Altenew's Winter Cardinal stamp set, Cool Summer Nights ink set and, exclusive to Laura's Loft, Glacial Bliss Design Creative Bling Sequin mix.  Those sequins are among my favorites!


Don't forget to leave a comment on each blog stop to be entered into the drawing to win the prize!  See you later!

Much love,
Jasmine

Handmade Christmas Series 2018: Day 1 Watercolors and EH Mondo Holly 2 ways

Here's an exciting sale for everyone!  ellenhutson.com is having a 20% off sale on all dies with the code above.  I...