Showing posts with label Faber Castell. Show all posts

Saturday, February 25, 2017

DT Post: Mixed Media Love Box with Infinity Engraving LLC

 Today's project was inspired by the lovebird chipboard die cut from Infinity Engraving LLC and my sisters favorite color, red.  I really enjoyed the process of designing and creating this project and absolutely adore how it turned out.  I wanted a blend between shabby-chic and harlequin romance, so I added a variety of textures and finishes to go along with the sections of stenciling. 
 Here is the link to the video tutorial on my YouTube channel if you'd like to see how this project came together.  My supply list is below.

Supplies:
Cardboard box with lid (mine is from Hobby Lobby)
White Gesso
Clear Gesso
Dylusions Cherry Pie acrylic paint
Prima Soft Matte Gel Medium
Tim Holtz Melange Tissue Wrap
Faber Castell Silver Texture Luxe paste
Tim Holtz Mini Trellis and Gothic Stencils
Infinity Engraving Lovebird die cut
Cosmic Shimmer glue
IndigoBlu Megaflake in Royal Peacock
Mini Hearts stencil
Nuvo Glimmer Paste in Garnet Red and Black Diamond
Nuvo Embellishment Mousse in Mother of Pearl
28 Lilac Lane Embellishment mixes in Dragon Fire, Rainbow Unicorn and Rose Garden
Little Things sequins in Rose Gold

 Give mixed media a try...it's so much fun and such an easy way to express yourself.  No rules, just art.  Thanks for stopping by to hang out.  Feel free to ask questions and let me know how you like it.  See you next time and don't forget to subscribe!
Much love,
Jasmine

Wednesday, December 7, 2016

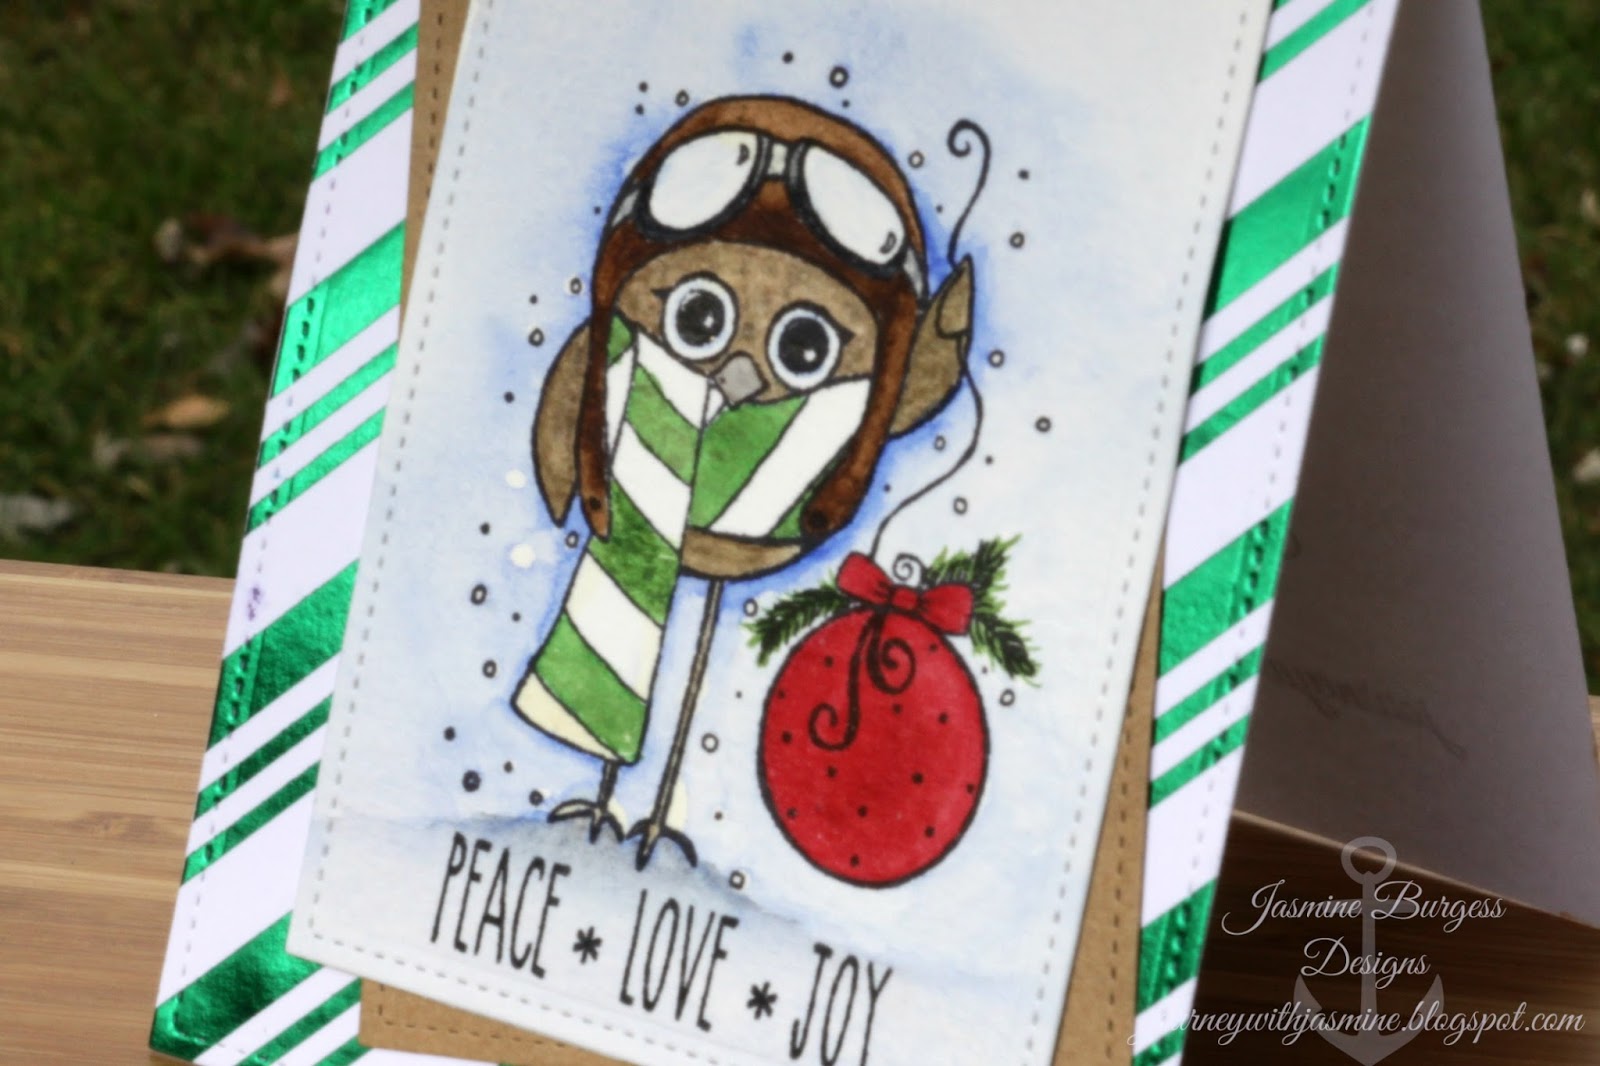
Handmade Christmas Series 2016: Card 7 Watercolor Owl Flyer

My wish for all of us this Christmas is that we feel the Peace, Love and Joy of Christ throughout the year.  This Pilot Owl image is the Cool Little Christmas set by Unity Stamp Company.  My grandfather used to have an old leather bomber jacket from WWII.  Even though he wasn't a pilot, that little owl reminded me of him and I can still smell the leather and pipe tobacco.  Such lovely memories.

I die cut both the watercolor paper and kraft cardstock with a stitched rectangle die and then stamped on the watercolor panel.  I also die cut the green striped panel; you don't have to, but I like the finished look it gives.  If you intend on using watercolors or any other wet medium, you'll want to make sure the stamping ink you're using will work with your coloring medium.  I used watercolors, so I used a waterproof ink.  If you're using Copic markers (alcohol based) you'll want to use a water-based dye ink to stamp such as Memento.  If you're using Zig Clean Color Brush Pens, those are water based so you'll want to use a waterproof ink to stamp such as Archival. 

By using a compatible stamping ink, you'll avoid smearing or running of your stamped image (and a lot of frustration and heartache!).  A basic rule of thumb for inks and mediums is that opposites attract.  Your ink needs to be unaffected by your medium.  Alcohol markers work well with water-based inks and water-based mediums don't affect or disturb alcohol or solvent based inks. 

Here is the link to the video tutorial on my YouTube channel if you want to see how I created this project from start to finish.  My supply list is below.

Supplies:
Unity Stamp Co Cool Little Christmas
Archival Black ink
Memento Black ink
Canson 140 lb watercolor paper
Faber Castell Pitt Artist Pen XS
Daniel Smith Watercolors
Masking Fluid
Lawn Fawn Stitched Rectangle dies
DCWV Evergreen Stack 12x12
Spectrum Noir Sparkle Pen - Clear
Neenah Solar White 110 lb cardstock (base)
Recollections Kraft cardstock
Scor-tape

Peace, Joy and Love to you and yours as we celebrate the coming of our Savior!  I'd love to know what you think or if you have any questions.  I love to interact with you guys and help in any way I can.  See you next time!

Merry Christmas and much love,
Jasmine


Thursday, July 28, 2016

Neat & Tangled Bible Journaling Card Series #1 with Tupelo Designs LLC

Welcome back!  Todays card is the first in a series of cards I've done using the Neat & Tangled Bible Journaling stamp set.  I had the ink blended background sitting on my desk from another project and having the layout of stamps in mind, I put the two together to create an inspiring and ethereal card.  I always have an eye out for stamp sets that allow me to share and express my faith, so this set was perfect for that.  While it's designed for use in a Bible, I wanted to share how to use it in cardmaking, since that is more in my wheelhouse.  Here is the link to the video on my YouTube channel if you want to see how I created this card and stay tuned as I have 3 additional cards coming up in the series with a fun surprise to wrap up!  

Supplies:
Neat & Tangled Bible Journaling
Neat & Tangled Bible Journaling Companion
Faber Castell Glass Bead Glitter Gel
Versamark
Nuvo Black Embossing powder
My Favorite Things Ink Lemon Drop
My Favorite Things Ink Orange Fizz
My Favorite Things Ink Razzleberry
My Favorite Things Ink Pure Plum
Cloud Stencil
Star Stencil
Neenah Solar White 110 lb cardstock
Glossy Accents
Wink of Stella Clear
EK Success powder tool
MISTI
Avery Elle Wonky Stitches die
Sequins
Distress Ink : Mermaid Lagoon and Blueprint Sketch

Thanks for stopping by and hanging out with me today!  Let me know what you think and if you have any questions.  See you next time!

Much Love,
Jasmine


Thursday, June 23, 2016

Mixed Media Faith Canvas with Infinity Engraving

 Hello and welcome!  Todays project is a mixed media canvas.  My faith in the Father, Son and Holy Spirit is certainly a cornerstone of my life as it's shaped who I am, my career, my marriage and how I go about everyday life.  I grew up in Northern Michigan and have always loved the water.  The lake is a refuge of sorts and that was the inspiration for this piece.  Here is the link to the video on my YouTube channel if you want to watch my process and all the supplies I used are listed below, along with a few close up shots of the different elements. 

Supplies:
9x12 canvas
Tim Holtz Melange Tissue Wrap
Prima Soft Matte Gel Medium
Dylusions London Blue Acrylic Paint
Dylusions Vibrant Turquoise Acrylic Paint
Dina Wakely White Gesso
Dina Wakely Blue Violet Acrylic Paint
Dina Wakely Lemon Acrylic Paint
Lindy's Stamp Gang pigment powder in Tweedle Dee Denim
Prima White Sand Texture paste
Stampendous Fratage Vintage Embossing Powder in Aged Gold
Faber Castell Glitter  Glass Bead gel
SU Vellum
Lindy's Stamp Gang Royal Peacock Fire Glitz Spritz
Lindy's Stamp Gang Hydrangea Blue
Distress Blueprint Sketch Spray and Reinker
Distress Crazing Medium
28 Lilac Lane Button Embellishment mixes in Cotton Candy and Winter Blues

Thanks for stopping by and hanging out with me today!  If you have any questions, leave them in the comments and I'll be happy to answer.  I'd also love to know what you think!

Much love,
Jasmine


Wednesday, May 18, 2016

Love Everyday - Mixed Media Canvas

Welcome back! Todays project is a mixed media canvas, complete with my first video! This project was a lot of fun to put together, has several different textures and finishes and I love the colors.  The stencils and peacock die cut are from Infinity Engravings and were supplied to me to have fun and create with as a member of their Design Team, but be sure that my opinions are always true and honest.  Here is the link to my YouTube channel: https://youtu.be/7Ce4CkYBrV8


Supply List:
Infinity Engraving die cuts and stencil

Oval Canvas 9"x12"
Tim Holtz Melange Tissue Wrap
Prima Art Basics Soft Matte Gel
Dylusions Acrylic Paints in Vibrant Turquoise and London Blue
Dina Wakely Heavy Body Acrylic in Blackberry Violet
Ranger Foil in Brights
Cosmic Shimmer flake and glitter glue
Versamark Ink
Judikins Iridescent Sparkle Embossing Powder
Wendi Vecchi Studio 490 Translucent Embossing Paste
Turquoise glitter
Glitter Ritz Cool Highlight glitter
Faber-Castell Glass Bead Glitter Gel
28 Lilac Lane Embellishments in Winter Blues, On Lilac Lane and Party On
Ranger Glossy Accents
Elizabeth Crafts Silk Microfine Glitter in Fire Opal
Wild Orchid Crafts paper roses
E 6000 glue

If you have any questions, feel free to leave them in the comments and I'll be happy to answer them the best I can and as always, I'd love to know what you think!

Much love,
Jasmine

Wednesday, April 13, 2016

Emerald Birdsong Canvas

 
Hey there! Todays project is this stunning canvas.  I was inspired by the changing of seasons and coming of Spring.  One of my favorite sounds is listening to the birds in the morning and using the bird chipboard die cuts from Infinity Engraving, I created my piece.  Here's how it came together!
Supplies:
6"x 8" Canvas
Tim Holtz Melange Tissue Wrap
Prima Soft Matte Gel
Faber-Castell stencils set 301
Imagine Crafts Creative Medium Purple Iridescent
Infinity Engraving bird die cuts
Tsukineko Essentials Glue pad
IndigoBlu Gilding Flakes in Lancaster Rose and Royal Peacock
Gelatos - Spearmint, Lime and Metallic Mint
Distress Paint - Twisted Citron, Cracked Pistachio and Lucky Clover
28 Lilac Lane Embellishment Bottles- Cotton Candy and Fresh Mint
28 Lilac Lane Embellishment Kits - French Quarter and Party On
Little Things sequin mix - Pretty Pansy

In the picture to the left is an assortment of products; I used some, but not all.  I started by tearing off a section of tissue wrap and adhering it to the canvas with matte gel medium.  I use a paintbrush to brush a thin, even layer over a quarter to a third of the canvas at a time and smooth the tissue wrap with my fingers or a bone folder.  I also adhere the wrap over the sides of the canvas as well.  It doesn't take long to dry.  My next step was to add the texture medium with a stencil.

I added dabs of Tombow to the back of the stencil and let it dry.  This creates a temporary stick, making sure the stencil doesn't shift when I add my texture paste.  The Imagine Crafts paste will dry to a pearl finish in one light and shift to purple.  It will take around an hour or so to dry; the thicker it's applied, the longer it will take to dry.  While that dried, I completed my birds.


Add fresh glue from the bottle to the pad.  Tap the glue pad over the surface of the die cut, as if you were inking a stamp.  The entire surface of the die cut should be shiny when it's covered.  Let them sit for 20 minutes for the glue to cure. 


After 20 minutes, add the gilding flakes to the die cut and tap to adhere.  You don't need a lot and the flakes are very light.  A lint roller comes in very handy for clean up. 


The black piece is a corner of a Ranger RUBit SCRUBit pad.  Using the scrubby side, rub over the surface of the die cut to remove excess flake and carefully over the edges as well.  Carefully funnel excess flake back into it's jar. 


The top two birds have Royal Peacock gilding flake and the bottom bird with nest has Lancaster Rose.


After my texture paste was completely dry, I added various shades of green gelatos over the tissue paper and blended them with my finger.  In some areas I added a tiny bit of water to my finger to help create a smoother blend and lighter color.  I also added shades of green distress paint in a few areas and Lucky Clover over the outer edges to bring it together.  I used the same matte medium to adhere the bird die cuts to the canvas.  I added a fair amount to the back with a paintbrush to ensure good adhesion and weighted them down until they were dry (I left it overnight).  Next, I wanted to use something new and a little different than what I usually use on my canvases.  Since I usually use metal elements and paper roses, I didn't want to use those here.  Since the die cuts had a metallic finish, I wanted to keep the focus on them. 

So I turned to my new button, beads and sequin mixes by 28 Lilac Lane.  I started by adding larger buttons with matte medium and adding in the smaller buttons, half pearls and sequins to look like leaves and flowers.  In a few other areas, I added medium and pressed beads into it.


Top third.

Bottom right corner.


Here is a shot of the purple shift in the texture paste.


Thanks for stopping by and hanging out with me today! Feel free to ask questions and let me know what you think! 

Much love,
Jasmine


Saturday, April 9, 2016

Mardi-Gras Inspired Mini-Canvas

 Welcome and thanks for stopping by!  Today's canvas is one I'm crazy about and I can't wait to share it with you!  The impetus to this design was the top hat shaker from Infinity Engravings.  

I had some new sequins sitting on my table, next to a naked top hat shaker to be.  I began to play around with color and elements and this is what came out of it.  The top hat is 5 layers of chipboard, all with a hole cut in expect the bottom layer.  Theres an acetate piece, also a top hat shape that sits between the top two layers to seal in the shaker bits.  I traced a scrap of black glitter cardstock to fit on the bottom layer so the bare chipboard wouldn't be visible through the shaker window.
I used Glossy Accents to glue each layer together because it's strong, dries fast and clear, and doesn't remain sticky after it's dry.  The top layer is etched with the lines that you'd see in a top hat- those lines remained visible after three layers of embossing powder, which is impressive and adds to the elegance of the piece.  Let's get to how I achieved the silver filigree.
Supplies:
VersaMark embossing ink
Black detail embossing powder
Silver pigment ink- Delicata Silvery Shimmer
Large filigree stamp - having a wood mount stamp will make it easier
Heavily ink a large filigree stamp.  Cover the top layer in VersaMark.  Cover with embossing powder and heat to melt.  Repeat the process two more times; while the third layer is still warm, press stamp onto the chipboard and lift off.  Let cool.  Glue bottom four layers of die cut together.  Add shaker bits.  Glue acetate in place and top with the final stamped layer.  Add feathers and roses.  Top hat is complete. 


I covered the canvas in printed tissue paper using gel medium as a glue.  Once dry, I added my acrylic paint.  I used Dina Wakely heavy body Acrylics in Blackberry, Magenta and Lemon.  I blended between the colors using my brush, so even though I only used 3 colors of paint, it looks like I have 5 colors.  After my paint was dry I added some texture with a stencil, texture medium, glitter and pigment powders.  I mixed two shades of green to add variety and depth to the composition.  Scoop 2 piles of about a teaspoon each of the texture medium.  Add glitter to both and each a different shade of pigment powder.  The ones I use are Magicals by Lindy's Stamp Gang, Mad Hatter Mint Green and Merry Go Round Green.  Smooth over stencil in an even layer, remove stencil and let dry. 

Wash stencil and palette knife immediatly, so the medium will ruin them if allowed to dry on there.  After it's dry, re-apply stencil and add a layer of gel medium.  Add seed beads and press into medium- this adds color and texture.  Let dry.

I used paper roses from Wild Orchid Crafts in a variety of sizes and colored them using ink sprays.
Purple: LSG Royal Amethyst Fire
            Dylusions Crush Grape
Blues: LSG Royal Emerald Fire
           LSG Hydrangea Blue
           Dylusions Polished Jade
           Distress Spray Stain Mermaid Lagoon
All the metal elements are from The Paper Studio "Spare Parts".  The Journey wood die cut is from my stash and I used the same technique as the top hat, without the filigree stamping: two layers of heat embossing with LSG Midnight Violet embossing powder.  The top hat, wood piece, roses and feathers are adhered using hot glue.  The metal elements are adhered using E6000; it's stinky, but the only glue I've found that holds on to metal. 

I hope you've enjoyed your time with me today! Feel free to ask questions and I'd love to know what you think!

Much Love,
Jasmine

Thursday, March 3, 2016

Hopping into Spring with Laura's Loft

Hello! Welcome to my stop on the Hopping Into Spring shop and hop with Laura's Loft. You should have landed here from Deana's blog, but if not and you want to start from the beginning, click on Laura.  We have lots of projects along the hop to inspire you today, not to mention a bomb prize pack giveaway to enter, exciting new CHA products added to the shop collections, a 15% off store-wide sale to celebrate National Crafting Month and as always, $10 off a purchase of $75 or more from the shop.  More details are at the bottom of my post :)

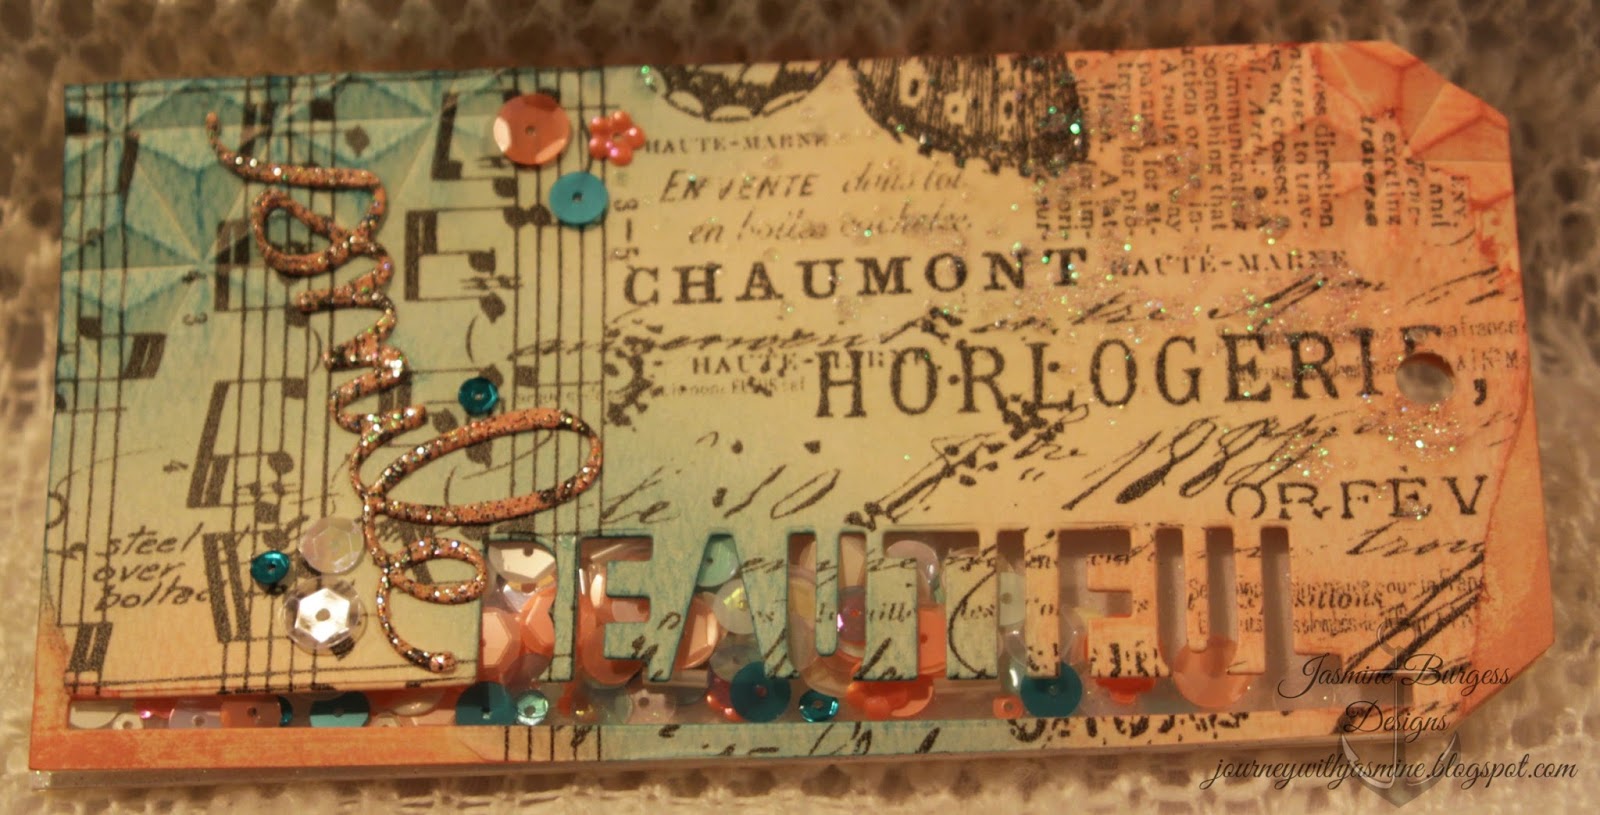
This shaker tag is my first project and I absolutely love how it turned out.  It was inspired by the colors in the Design Creative Bling Sequin Mix in Lauren's Bouquet, which is exclusive to Laura's Loft.  Let's see how it came together.


Supplies:
Ranger #8 Manila tag (2)
Distress Inks in Tattered Rose (Set #10), Abandoned Coral (Set #13) and Mermaid Lagoon (Set #13)
Faber-Castell Glass Bead Glitter Gel
VersaMark
WoW Clear Supergloss Embossing powder
Tim Holtz Speckles Stencil
Tim Holtz Beautiful Die
Simon Says Stamp smile die
WRMK Fuse Tool
WRMK Next Gen 3D Gemstone embossing folder
Avery Elle Stamp Pockets
Design Creative Bling Sequin Mix in Laurens Bouquet
Tim Holtz Melange Tissue Paper
Prima Art Basics Soft Matte Gel
3M Foam Tape
Scor-tape - 1/4" and 1/8"
Tombow Mono Multi liquid glue

Plug in your Fuse tool to let it warm up.  It takes a good 15 to 20 minutes.  Tear off a section of tissue paper wide enough to cover the tag.  Adhere paper with matte gel using a large paint brush.  I like to brush a thin, even layer of gel over a third of the tag at a time and smooth out the paper with a bone folder.  Once it's adhered, I place it under something heavy for 15 minutes or so to dry (this helps to keep it flat).

Once dry, place the die along the right edge of the tag, leaving at least 1/4" border along the outer edge.  You'll need that to adhere the shaker pouch later.  Run through the Big Shot (or other die cutting machine).   Use the actual die cut for another project.  Using the embossing folder, I did some partial embossing on the top and bottom left corners of the tag.  The "smile" die cut was from another tag covered with the same tissue paper.  I covered it with VersaMark and heat embossed it with clear embossing powder.

To create the peachy-orange color in the sequin mix, I tap back and forth a couple times between Tattered Rose and Abandoned Coral and blend onto the tag, starting on the edges and working in toward the middle.  I kept all the inking on the light side to keep the vintage feel of the tissue paper and to coordinate with the sequins.  Mermaid Lagoon is an intense color, so I was sure to keep a light hand with it as well.  I inked the smile die cut with the same Tattered Rose/Abandoned Coral mix to make it stand out against the Mermaid Lagoon.  I really like how the inking makes the texture of the embossing stand out.  AFTER the ink is dry, I added more texture and sparkle with the glitter gel and Speckles stencil.  Make sure you wash your stencil and palette knife as soon as you're done using them; the gel will ruin them if it dries on.


 Time to make the shaker pouch from a stamp pocket.  I like to lay the pocket down over the back of the tag and draw my seam lines on using a sharpie and the ruler.  I added Scor-tape adhesive along the edge of the word on each side and where I could on the back of the letters.  I leave at least 1/4" of plastic along the outer edge of the seam to attach it to the tag.  Don't forget to leave an opening to add your shaker bits.  Add the bits and seal it up.  As you can see, I made a long and narrow pouch so that the sequins would show along the entire cutout.  I added a double layer of 3M Foam tape to add stability and make a level surface of the finished tag.  Adhere the smile die cut and a few sequins to the front with Tombow liquid glue and our tag is finished.


This watercolor card is my second project and was a lot of fun to do.  I used the original set of Colorburst watercolors, Liquid Metals Colorburst, stamps and gold embossing.  Let's get started.

Supplies:
Strathmore 140 lb hot press watercolor paper
WorldWin Petallics Cardstock in Gold
Neenah Solar White 110 lb cardstock
Colorburst pigments in Pthalo Green, Ultramarine Blue,
Violet, and Lemon Yellow
Colorburst Liquid Metals in Mandarin, Amethyst, Sky and Jade
Altenew Beautiful Day stamp set
Unity Wondrous stamp
Archival Black ink
MISTI
Post It notes
VersaMark ink
WOW Metallic Gold Superfine Embossing Powder
Lawn Fawn Stitched Rectangle dies, largest two
Fun Foam
1/2" Scor-Tape
Black Velvet #4 paintbrush

Step 1)  Starting with a 4.25" by 5.5" piece of watercolor paper and the MISTI, stamp the rose outline from the Beautiful Day set in the top left corner in Archival black ink.  When using watercolors, or water techniques, make sure the ink is waterproof when dry.  Otherwise it can smear and run.  Stamp the rose on a Post-It note and cut it out, making sure to stamp with the adhesive on the back.  Add the mask on top of the rose and stamp the leaves to the right of the rose and the flower spray along the left edge.
Step 2)  Stamp the Wondrous stamp in the middle, but along the right edge, in the same ink.  Stamp the sentiment towards the bottom left edge in VersaMark ink.  Remove the mask from the rose and stamp it again in VersaMark.  Using the MISTI makes this much easier.  Add Gold embossing powder over the rose and sentiment.  Tap off excess and return to the jar.  Heat to melt.
Step 3)  Colorburst are powdered watercolor paints.  They are fun, but can be messy and unpredictable.  I spray my paper with two or three spritzes of water and add the colorburst powder lightly and spread with a paintbrush if necessary.  If two colors mix too much, just use a paper towel to soak it up and remove it.  Be careful with purple and yellow; these are complimentary colors, but will make brown if they mix.  Let dry.
Step 4)  Using a paintbrush, make a drop of water on your work surface.  Add a tiny bit of blue to the drop and add color to the girls hair.  Add color to the flowers with the girl using the Liquid Metals.  Let dry.
Step 5)  Position the smaller of the two Stitched Rectangles dies over the watercolored piece and run it through the Big Shot.  Run a 4.25" by 5.5" piece of the gold cardstock through the big shot with the largest of the rectangle dies.  Adhere the gold piece to a card base using Scor-tape.
Step 6)  Cut a piece of fun foam slightly smaller than the watercolored piece and adhere it to the back with Scor-tape.  Remove the backing from the tape, center it over the gold and stick it down.  Our card is complete!

Be sure to check out these collections for
new additions we have this month:
Stamping Bella stamps
Hero Arts stamps, including Handmade Kindness
Tim Holtz Distress watercolor paper,
Lawn Fawn Paper packs

We will be having an extra Hop coming up as we are finally getting in the last of our CHA New Releases and there will be lots of Inspiration heading your way soon along with some awesome prices and sales.  But first, we aim to knock your socks off with a store-wide sale, 15% off everything in the store starting NOW thru to April 3 at Midnight, as well as $10 off at checkout for all order $75 or more: use code $10off75 at checkout!

Here is a complete list of stop on the hop this month:
1. Laura - http://www.lauralscott.com/hopping-into-spring/
2. Deana Benson -http://www.designcreativelybling.com/2016/03/hopping-into-spring-with-lauras-loft.html
3. Jasmine Burgess - You're here!
4. Robbie Rubala - http://inkedx2.blogspot.com/search/label/LL
5. Emma Hall - http://heartofcraft.blogspot.com/2016/02/hopping-into-spring-with-lauras-loft.html
6. Sue T.-http://thecre8tivestudio.blogspot.com/2016/02/hopping-into-spring-at-lauras-loft.html
7. Lisa - http://royalpumpkinart.blogspot.com/2016/02/hopping-into-spring-with-lauras-loft.html

Now for that killer prize pack I mentioned! Sweet, eh!


There are several ways to enter and the more comments you make in the different social media platforms, the more entries you earn! It is required that you comment on each blog in the Hop.  After that, you are encouraged to like and comment on our Facebook page, tag on our Instagram and pin on Pinterest, as well as share on your own pages. The participant with the most entries wins the fabulous prize package! How cool is that!?!  Robbie is the next stop on the blog hop and I'm sure you'll love what she has to offer.

Thanks for hanging out with me today! I hope you had fun and were inspired to try something new! Be sure to comment to be entered to win!  See you later!

Much love,
Jasmine


Thursday, February 4, 2016

Somebunny's Luck


Welcome to the Somebunny's Luck blog hop with Laura's Loft.  We have tons of awesome projects to share with you, not to mention a giveaway, new products added to the shop and as always, $10 off a purchase of $75 or more from the shop.  More details are at the bottom of my post :)

My projects focus on celebrating the hope that Christ provided on Easter Sunday. I wanted to convey faith, light and joy in my Savior through my work to share with you.

My first card features Altenew's Beautiful Day stamp set from Laura's Loft.  This is a layering stamp set and while gorgeous just about any way you stamp it, using my MISTI made this so easy and fun and it turned out beautifully.

Supplies:
Neenah Solar White 110 lb cardstock
DCWV Glitter Brights cardstock stack: 4.25 by 5.5 inch panel
DCWV Foiled cardstock stack
MISTI stamp positioner
Xyron Sticker Maker
Altenew Beautiful Day stamp set
Inks:
Simon Says Stamp in the following colors:
  • Pale Blush Pink
  • Cotton Candy
  • Doll Pink
  • Orange Peel
  • Lemon Chiffon
  • Lavender
  • Hydrangea
  • Blue Violet
Lawn Fawn in the following color:
  • Sunflower
Simon Says Stamp dies:
Oh Happy Day
Nativity (star)

Lawn Fawn Stitched Rectangle die
Tim Holtz Rays stencil
Wendi Vecchi Translucent Embossing Paste
Tim Holtz Alcohol Ink in Sunshine Yellow
Prima Finnabair Glitter in yellow
Inkadinkadoo Masking Paper or Post-It notes
Palette knife

Step 1.  Start with a 4.25 by 5.5 inch panel of white cardstock.  When using masking with stamping, you want to stamp the image you want in the front of the scene first.  In this case, I wanted the yellow rose to be in the front.  With layered stamping, you stamp the lightest color first.  The stamp sets come with instructions for what layer to stamp first, so don't worry about that.  For the yellow rose, I started with SSS Lemon Chiffon ink, then LF Sunflower and SSS Orange Peel last.  While that dried, I took the outline stamp from the set and stamped three on masking paper and fussy cut them out.  You'll need one to finish the stamping and then the other two later on.  Place one mask over the yellow rose, being careful to line it up properly.  Pink rose: Pale Blush Pink followed by Cotton Candy and finished with Doll Pink.  Purple Rose: Lavender, followed by Hydrangea and finished with Blue Violet.  I used my MISTI with this because it allows you to line up the stamps on the project so it's a perfect image.  If there's a spot that doesn't stamp properly, you can ink the stamp and stamp again and it will line up perfectly.  It's awesome!

Step 2.  I used the second largest of the LF Stitched Rectangle dies and ran it through my Big Shot to get the stitching detail around the edges.  Place your masks over each rose so that it's aligned properly.  Line up the stencil so that it looks like the rays are coming from behind the roses.  I tape my stencils into place to make sure they can't shift.  Using a palette knife, take about a teaspoon of embossing paste from the jar and place it on a non-stick work surface.  Add a bit of glitter and 1 drop of yellow ink.  I wanted it to look like light, so I wanted it to be translucent and airy.  Mix the ink and glitter into the paste until there's no white left.  Spread over the stencil, making sure to cover all the exposed paper and it's an even coat.  Remove the stencil and wash both the stencil and palette knife immediately.  Letting the paste dry on them can ruin them.

Step 3.  While the paste dries, run the dies and gold cardstock through the Big Shot.  I ran my die cuts through my Xyron Sticker maker to add adhesive to the back.

Step 4.  Adhere the 4.25 by 5.5 inch teal glitter panel to a white cardbase using tape runner or another adhesive.  Adhere stamped panel to the middle.  Add sentiment die cuts along the bottom edge.  I started with Happy in the middle and added Oh and Day on the appropriate side to get proper spacing and placement.  I finished off my card with the star in the top right corner, shining in the sunlight.


For my second card, I made a shaker card and wanted to convey the same theme as my first card; faith, hope and life in Christ.

Supplies:
Strathmore 140 lb coldpress watercolor paper
Dylusions Spray Inks:
  • Calypso Teal
  • London Blue
  • After Midnight
Lindy's Stamp Gang Sprays:
  • Glitz Spritz Royal Emerald Fire
  • Hydrangea Blue
Perfect Pearls Spray in Pearl
Faber-Castell Glass Bead Glitter Gel
Simon Says Stamp Cross die
TH Rays Stencil
Palette Knife
Avery Elle Stamp Pockets
WRMK Fuse Tool
Recollections Glitter Shapes
Doodlebug Sequins
MSE Sequins and Glitter Shapes
3M Foam Tape
Stick-It Adhesive
DCWV Foiled Cardstock
Memory Box Alphabet die
Scor-Tape 1/8 and 1/4 inch

Lets start with the focal panel.  I like to take 11" by 17" sheets of watercolor paper and use spray inks to create large pieces I can cut down to use in my projects.  I have another tutorial for how I do it on my blog here.

Step 1.  Using the largest of the LF Stitched Rectangle dies, run the panel through the Big Shot.  Place Cross die on the panel where you want the cross and tape in place (I use painters tape, Post-It note tape or washi tape) and run through the Big Shot to die cut.  Set the Cross aside for another project.

Step 2.  Plug in your Fuse tool so it can heat up.  I wanted my rays of light to be shining over the Cross, so I arranged it thusly and taped in place to avoid shifting.  Spread glitter gel over stencil, making an even coat and making sure to get all exposed paper.  Lift stencil and wash both stencil and knife immediately.  Let dry; it should take between 15 and 20 minutes to dry completely and dries clear.

Step 3.  While the panel is drying we can make our shaker pouch.  I used the die cut cross as a size guide.  You want your shaker to fill the die cut opening with a bit of extra plastic to allow for adhering the pouch to the back side of the panel.  I filled my pouch pretty full so that the entire cross was full, but normally I like to allow room for the shaker bits to move around.  Using the ruler that comes with the Fuse, make the seams where you want them, leaving an opening and add your shaker bits.  Carefully flatten out your pouch to determine if it's full enough to your liking and make sure it's no more than 1/4 inch thick after it's sealed.  Add your final seam to close it up.  Before I trim my edges, I add 1/4" Scor-Tape to the edges to attach it to the front panel.  Then I trim off any excess plastic.  Remove the backing and adhere it to the front panel.

Step 4.  Add foam tape around the edges of the panel and double up.  You want to add enough to add stability and make the surface level.  I used two layers.  I remove the backing from one corner and line it up.  Once the corner is stuck down and it's lined up properly, remove the rest of the backing to completely adhere.

Step 5.  Add some Stick-It adhesive sheet to the back of the gold foil cardstock.  Using the an alphabet die and gold foil cardstock, run it through the Big Shot enough times to get the letters to spell "Hallelujah".  I had to run mine through 3 times.  I picked out the letters I needed and starting with "l" in the middle, spelled out the word, removing the backing paper and sticking down each letter.  My card is complete and I loved it.

There is lots more to be enjoyed on the hop! Your next stop is at Robbies, the previous stop is at Deana's and if you want to start at the beginning, head over to Laura's.

Hop blogs are listed below in case you get off track or want to visit one of us again:

1. Laura -  http://www.lauralscott.com/somebunnys-luck
2. Deana Benson -http://www.designcreativelybling.com/2016/02/somebunnies-luck-with-lauras-loft.html
3. Jasmine Burgess - You're here!
4. Robbie Rubala - http://inkedx2.blogspot.com/search/label/LL
5. Heart of Craft - http://heartofcraft.blogspot.com/2016/02/lauras-loft-shop-and-hopsomebunnies-luck.html  (Emma)
6. Lisa - http://royalpumpkinart.blogspot.com/2016/02/st-pattyseaster-shop-hop-with-lauras.html
7. Linda-  http://dabblesbylinda.blogspot.com/2016/02/somebunnys-luck-with-lauras-loft.html
8. Sue T.-  http://thecre8tivestudio.blogspot.com/2016/02/february-blog-hop-at-lauras-loft.html
9.Kim- http://angeldreamcrafts.blogspot.com/2016/02/happy-st-pattys-day-with-lauras-loft-dt.html
10.- Noe.- http://elscrapdecrisynoe.blogspot.com.es//2016/02/laurasloftfebruaryhop.html

Giveaway Entry:
There are several ways to enter and the more comments you make in the different social media platforms, the more entries you earn! It is required that you comment on each blog in the Hop.  After that, we encourage you to like and comment on our Facebook page, tag on our Instagram post and pin on Pinterest, as well as share on your own pages. The participant with the most entries wins the fabulous prize package! How cool is that!?!

Prize: Wait for it...

Boom! WRMK Fuse Tool, Laura's Loft Exclusive Jewel Box Sequin Mix, WOW Opaque White Ultra High Embossing Powder and a pack of Virginia Turtle Enamel Dots.  I'd say that's a killer prize pack!
Bonus: All the Christmas items are a generous 45% off (no coupon code required) and Laura always offers $10 off a purchase of $75 or more with the code: $10off75.

Be sure to stop by and see all the new products we've added to our collections!
Tim Holtz Mini Ink Kits
Stamping Bella
Hero Arts
Ranger
Lawn Fawn

Design Creative Bling Sequin Mixes, a Laura's Loft exclusive


Thank you for stopping by and hanging out with me for a bit! I hope you enjoy the hop, enter the giveaway and get inspired to create something amazing.  I'll be happy to answer any questions and hope you'll let me know what you think!

Much love,
Jasmine

Thursday, January 7, 2016

Love Grows Here Blog Hop with Laura's Loft

Hello! Welcome to January's blog hop at Laura's Loft.  We have lots of talent to share with you and I hope you find lots of idea's and inspiration along the hop.  You should have arrived her from Deana's blog, but if you want to start from the beginning, head to Laura's.  Don't forget to leave a comment at each hop stop to enter for the giveaway.  Entry details, sale info and a discount code are at the bottom.
My project started with glossy cardstock and alcohol inks.  While that dried, I die cut "friend" by CAS-ual Fridays from silver foil cardstock.  The stamps are from the Girlfriend set, also by CAS-ual Fridays, and I stamped them using the MISTI.  I stamped the "love ya" three times as the silver alcohol ink acted as a bit of a resist, but I loved the almost smokey effect it gave.  To add some interest, I applied Faber-Castell Glass Bead glitter gel using a heart stencil and palette knife, finishing it off with a few enamel dots once the glitter gel was dry.  To add the stitching detail, I used the largest of the Stitched Rectangle dies from Lawn Fawn.  I mounted the finished panel on a white card base and it was complete.

This my second project for today's hop.  The stamp sets are Beautiful Day by Altenew and the same CF Girlfriends stamp set and die as my first project.  Beautiful Day is a layering stamp set.  Using 3 shades of one color, the first stamp is the lightest shade, the second is the middle shade and the last is the darkest shade.  For the middle rose, I stamped the outline in Archival Black and the rose in Momento Angel Pink, Lulu Lavender and Lilac Posies.  The other two are Simon Says Stamp inks in Cotton Candy, Pale Pink Blush and Doll Pink.  The leaves are Simon Says Stamp Green Leaf and Midnight Green.  I stamped "friend" in Delicata Golden Glitz ink and layered the die cut "friend" over it, making the gold act as a shadow and to bring out the gold in the die cut.  To finish of my stamping, I stamped "hey there" in SSS Doll Pink.  The front panel and vellum are die cut using Lawn Fawn's Stitched Rectangles die set (I can't seem to get enough of the stitching detail!).  The front panel is popped up using foam tape and the DCWV foiled vellum panel is adhered using Scor-tape over a SSS Doll Pink card base.  To complete the card, I added a few sequins from the same mix I used on the first card, Garden Splendor.
The next stop on the hop is Robbie and I'm sure you'll love what she has to offer!

Feel free to let me know what you think and I'd be happy to answer any questions!


Here is a list of the each stop on the hop:

1. Laura  -  http://www.lauralscott.com/love-grows-here/
2. Deana Benson -http://www.designcreativelybling.com/2016/01/lauras-loft-love-grows-here-shop-and-hop.html
3. Jasmine Burgess -http://journeywithjasmine.blogspot.com/2016/01/love-grows-here-blog-hop-with-lauras.html
4. Robbie Rubala - http://inkedx2.blogspot.com/search/label/LL
5. Heart of Craft - http://heartofcraft.blogspot.com/2016/01/lauras-loft-hop-and-shop-love-grows-here.html (Emma)

6. Sue T.- http://thecre8tivestudio.blogspot.it/2016/01/blog-hop-at-lauras-loft.html
7. Kim- http://angeldreamcrafts.blogspot.com/2016/01/lauras-loft-dt-january-blog-hop.html
8. Linda Gorman-  http://dabblesbylinda.blogspot.com/2016/01/love-grows-here-with-lauras-loft.html
9. Lisa Bedigian - http://royalpumpkinart.blogspot.com/2016/01/love-grows-here-shop-hop-with-lauras.html
10. Valentina Dalmonte - http://valentinascrap.blogspot.com/2016/01/love-grows-here-dtlaurasloft.html


Giveaway Entry:
There are several ways to enter and the more comments you make in the different social media platforms, the more entries you earn! It is required that you comment on each blog in the Hop.  After that, you are encouraged to like and comment on our Facebook page, tag on our Instagram post and pin on Pinterest, as well as share on your own pages. The participant with the most entries wins the fabulous prize package! How cool is that!?!

Prize: Wait for it...

Boom! WRMK Next Level Embossing Folders, Heat Wave Pen kit, Laura's Loft Exclusive Garden Splendor Sequin Mix and a pack of Virginia Turtle Enamel Dots.  I'd say that's a killer prize pack!
Bonus: All the Christmas items are a generous 45% off (no coupon code required) and Laura always offers $10 off a purchase of $75 or more with the code: $10off75.

Thanks for hopping with us!! I hope you had fun and learned something new.  See you next time!

Much love,
Jasmine


Handmade Christmas Series 2018: Day 1 Watercolors and EH Mondo Holly 2 ways

Here's an exciting sale for everyone!  ellenhutson.com is having a 20% off sale on all dies with the code above.  I...