Showing posts with label Delicata. Show all posts

Monday, July 30, 2018

Simply Colored Fuchsias


Hey guys!  Todays project has simple coloring and minimal embellishments while being quite pretty.  I'm one of those crafters who likes bling and upping the wow factor, but I wanted to demonstrate that it's not always necessary and sometimes, less IS more.  Fuchsias are sentimental for me because I grew up with them; my mom loves them and she always had several baskets hanging around the house.  Hummingbirds are sentimental because my nephew loves them and always says "Jazz, look at the hummingbirds" when he sees them at his feeders.  I'm still young at 36, but as I get older, I'm realizing how important moments are with the people you love.  This card is full of memories and faith and so much love.

Here is the link to the video on my YouTube channel.  My supplies are listed below.

Supplies:
Avery Elle Hummingbird stamp set
Avery Elle Wonky Stitches die set
Ink on 3 Blackout ink
MISTI

Bristol Smooth cardstock
Janes Doodles Bless Your Heart stamp set
Arteza Brush Markers
Versamark
Nuvo Black Embossing Powder
Copic Markers: B000 and B0000
Bazzill Candy Necklace (4.25"x5.5")
Ranger Matte Medium
Pretty Pink Posh 4mm Clear Droplets
Nuvo Clear Glitter Gloss pen
Be Creative Tape (also called Scor-tape)
Delicata Golden Glitz

Thanks so much for hanging out with me!  Happy to help if you have any questions!

For Christs glory and much love,
Jasmine

Monday, March 19, 2018

Foiled Peony with Ink Blending and Dry Embossing

 Full disclosure: I did not set out to make this card.  It was actually an experiment that went really right!  I used the Peony Coverplate die from Papertrey Ink and die cut it to see if it would work as a stencil for the Deco Foil transfer gel.  After using the gel and letting both pieces dry, I ran both through my laminator and was ecstatic with the results.  I used a textured cardstock I've had in my stash forever because it's a little heavier and that texture gave the foiled piece a really cool, vintage vibe that I liked better than the stenciled piece.  I used Amethyst Watercolor foil with it, so it has variegated purple tones and it just stunning.  I HAD to use it on a card.  I wanted to keep the ink blending really soft so that the foiling would stand out and to give it another texture.  And for one more element of texture, I dry embossed the white cardstock that I then ink-blended.  If you watched my alcohol ink video using this same die, then you'll be familiar with how I used the diecut to guide where I placed my colors of ink.  To finish it off, I added a die-cut sentiment in a medium teal and my card was complete. Click here to watch my video tutorial over on my youtube channel.  Supplies are listed below.
Supplies:
PaperTreyInk Peony Cover plate die
Mama Elephant Smile die
Scor-tape 
Neenah 110lb Cardstock (base)
Damask embossing folder
Sizzix leather paper (cardstock is fine)
Deco Art Transfer gel
Deco Art Amethyst Watercolor foil
Simon Says Stamp inks
Teal
Fern
Lawn Fawn inks:
Ballet Slippers (really soft pink)
Peachy Keen
Minty Fresh
Hero Arts ink: Tide Pool
Delicata White Shimmer ink
Scor-tape/ Be Creative tape (same product)

Monday, November 27, 2017

Handmade Christmas 2017: Joy to Light Up Your World using Concord & 9th and Chibitronics

  Joy is an emotion that a lot of people struggle with, so I wanted to create a design that was simple.  Joy is not the same as happiness or excitement.  Joy is what loving memories are made of.  Joy is created when you take the time to slow down and immerse yourself in the moment, taking stock of those you love and those that love you.  Joy is a gift from our Triune God and it persists through pain or lonliness or grief.  Christmas is celebrated by many different traditions and cultures around the world, but what links them together is the gift that was made available through the birth of the Savior Jesus Christ.  That, if nowhere else, is where our Joy can be found and embraced. 
   Yes, it lights up!  How fun is that!  Todays project is a light up using vellum in order to let a little more light show through and it's so pretty.  I've been having so much fun using the Chibitronics circuit builder set because it really is easy and allows you to create such fun and interactive cards.  I chose Teal and Gold for this card because I wanted to do a mix between traditional and festive with the colors and they look great together.  Here is the link to the video on my YouTube channel showing you step by step how to recreate this card at home or, better yet, take your own spin on it.  My supplies are listed below.

Supplies:
Concord & 9th Joy S&D
MISTI
DCWV Shimmer stack
Vellum
Scor-tape
Delicata Golden Glitz ink
Avery Elle Wonky Stitches die
Chibitronics set
3M Foam tape
Versamark ink
Simon Says Stamp Ultrafine Antique Gold EP
Neenah Classic Cream cardbase
White cardstock

Thanks for stopping by!  Let me know if you have any questions (about cards or Jesus ;) )

Merry CHRISTmas,
Jasmine

Monday, March 6, 2017

Hello Lovely with Concord & 9th

The style and design of this card is out of my box and I love it!  The Hello Lovely stamp set by Concord & 9th is crazy beautiful and crazy versatile; you can create anything from birthday to condolences cards.  This set will get used A LOT.  Here I kept it simple with varying tones of gray and a pop of gold to highlight the different fonts and to add just a touch of sparkle.

Here is the link to the video tutorial on my YouTube channel and my supply list is below.
Supplies:
Bristol Smooth cardstock
Hello Lovely by Concord & 9th
Memento Tuxedo Black ink
SSS Fog and Slate ink
MISTI
Delicata Golden Glitz pigment ink
Lawn Fawn Stitched Rectangle die
DCWV Twinkle Glitz paper stack
Ranger Matte Medium
Little Things Warm Golden Glow sequin mix

Thanks for stopping by!  Don't forget to subscribe and I'll catch you next time.

Much love,
Jasmine

Friday, February 17, 2017

Blessed Stars: Ink Blended and Dry Embossed Background

 Hello friends!  Todays project has a few techniques that while simple and easy are also eye-catching and dynamic.  Ink blending is such an easy and well known technique, but can be challenging to perfect.  Changing my cardstock to Bristol Smooth (I use Strathmore) was a game changer for me.  Secondly, lightening the pressure I applied made things so much easier.  By keeping your hand light, you're creating less friction between your blending tool and the surface of the paper, allowing for smoother movement and better payoff.  You can use any dye ink, not just Distress, as well as pigment inks.  Delicata brand pigment inks dry faster than any other pigment ink I know of and do not need to be heat set or embossed.  When using pigment inks to ink blend, you're applying a lighter layer, which also allows for faster drying.  I also suggest practice.  No skill gets perfected without practice, so allow yourself to have fun and relax when trying out a new technique. 
 Here is the link for the video tutorial on my YouTube channel if you are interested in how to re-create this card or learn the techniques and my supply list is below.  This would be a great design for a masculine card if you die cut the blessed from black cardstock and left off the sequins.
Supplies:
Strathmore Bristol Smooth cardstock
WRMK 3D Shatter embossing folder
Delicata Golden Glitz pigment ink
Lawn Fawn Stitched Rectangle die
Distress Ink: Mermaid Lagoon, Wilted Violet
Imagine Crafts Shimmer Spritz
SSS Blessed die
Fun Foam
Stick-It Sheet adhesive
PTI Simple Stars
Versamark
Ranger Sparkle Black embossing powder
Little Things Iridescent White, Star Shine
Ranger Matte Medium
Neenah 110 lb cardbase
Scor-tape

Thanks for joining me today!  I hope you learned and had fun.  Be sure to let me know how you liked it or what products or techniques you'd like to see in future videos.  See you next time!

Much Love,
Jasmine

Monday, February 13, 2017

DT Post: Faith based Spring Mixed Media with Infinity Engraving LLC


 It has been a minute since I've done a mixed media canvas and I missed it!  I love card-making but being creative on larger scale has it's own appeal.  I like doing irregular or unexpected shapes with my pieces because for me, it inspires creativity.  I love texture, color and purpose in my work.  With so much unrest and animosity in the world today, I wanted to project of the some love, peace and hope that I find through my faith in Christ into it.  That is the purpose behind todays piece.

I started with a 10" circle board.  These come in a variety of shapes and sizes and are made of layered chipboard.  I bought mine at Hobby Lobby.  After adding three coats of white Gesso (acrylic medium), I covered my board with Tim Holtz "Melange" Tissue Wrap using Prima Soft Matte Gel, smoothing over the surface and wrapping around to the back.  After that was dry, I went in with acrylic paint.  I laid down a coat of clear Gesso to make the paint go on a little thinner so that you could see the print of the tissue paper and to make blending easier.  I used pink and green, which are complementary colors.  Complementary colors means that if you mix them together, they make brown.  So where they met on the canvas, I was careful not to blend them too much.


 After the paint was dry, I applied the vellum centerpiece.  I created the wording on my computer in Word and printed it on vellum.  To make a sticker out if it, I applied Stick-It sheet adhesive to the back so that the adhesive wouldn't be visible through the vellum and used a square die to die cut it.  You could also use a paper trimmer.  My chipboard die cuts and wood heart buttons are from Infinity Engraving LLC.  I wanted the wood appearance and texture to show and just used the buttons as is.  I used spray inks to color the rose and vine die cut as well as the corner trellis.  I let those dry while I added my stenciling. 

If you want to use water-based mediums on chipboard do not prime with Gesso.  Gesso is an acrylic base medium that makes whatever it's put on non-porous.  If you want to use water-based mediums, but want a white base, use watercolor grounds instead of Gesso. 

 I used E6000, which is an industrial strength glue specific to metal, to attach my metal embellishments.  It's really the only glue I've found that holds metal; the other mediums I've tried don't hold very long, including hot glue.  The only thing to be mindful of when using E6000 is that it has a strong chemical odor and needs to be used with ventilation.  I live in Michigan and open my windows, even in winter, when using it. 

 To adhere the rest of my embellishments, I use the same Prima Soft Matte Gel that I adhered the tissue paper with.  It dries matte and clear, so you can't see it if it oozes out anywhere and holds perfectly.  All the button, seed beads and flat-back pearls are from 28 Lilac Lane Button mixes and embellishment kits.  I pour them out into a little dish and use them to fill in and around to complete the project.  With the varied sizes and finishes of all the elements, it makes it really easy to shape a cohesive look while maintaining the focus on the center.  To finish off, I added a few enamel dots here and there.

Here is the link to the video tutorial on my YouTube channel if you'd like to see how this project came together.  My supply list is below.

Supplies:
10" Circle Board (Hobby Lobby)
Dina Wakely White Gesso
Tim Holtz Melange Tissue Wrap
Prima Soft Matte Gel medium
Vellum
Stitck-It sheet adhesive
Square die
Dylusions acryilic paint in Bubblegum Pink, Cut Grass and Fresh Lime
Dina Wakely Clear Gesso
Distress Ink Spray: Twisted Citron
Dylusions Spray Inks: Funky Fuchsia, Bubblegum Pink, Bubblegum Pink Mica, Cut Grass
Lindy's Stamp Gang: Lucky Shamrock Green, Salt Water Taffy Pink
Infinity Engraving corner die cut, rose die cut and Wood heart buttons
Versamark ink
Delicata Golden Glitz pigment ink
Perfect Pearls: Pearl, Gold, Forever Green
Herringbone stencil
TH Mini Blossom stencil
Hot Off The Press butterfly stencil
28 Lilac Lane mixes in Pretty Princess, Cotton Candy, French Quarter, New Leaf
E6000
Doodlebug enamel dots

If you are wanting to try mixed media, but feel intimidated, try starting with something small.  You'll never create something you love if you never try to begin with.  As always, I'm happy to answer any questions you have, so don't be afraid to ask.  See you next time!

Much love,
Jasmine

Thursday, November 10, 2016

Handmade Christmas Series: Card 2 Featuring the 2016 SOA Collection

Hello!  Merry Christmas!  Todays project is a fun design with a contemporary edge that's perfect for masculine cards.  Another way I picture this card is in red, black, and gold, which would also be perfect for masculine cards and would look stellar.  In this card we have a watercolored background with heat embossed white puffy stripes, a two-tone, layered stamped tree, stamped and die cut stag and a die cut sentiment.  I had a lot of fun putting this card together and playing with everything in the 2016 Stamp of Approval holiday collection.  Here is the link to the video tutorial I have on my Youtube channel if you want to see start to finish how you can re-create this card at home.  I encourage you to experiment and use my design as a inspiration to create something unique to you or just copy it, lol.  Everything I used is listed below.

Supplies:
Peppermint Stick background by Catherine Pooler Designs
MISTI
Simon Says Stamp White pigment ink
Wow White Puff embossing powder
Simon Says Stamp Mint Candy and High Dive inks
Hip Holiday stamps and dies by Catherine Pooler Designs
Delicata Silvery Shimmer pigment ink
DCWV Twinkle Glints cardstock stack
DCWV Foiled cardstock stack in Gold
Neat&Tangled Happy Holidays die (from 2015 Holiday SOA)
Scor-tape
Tombow Mono Multi liquid glue
3D foam squares
Glue dots

Thank you for stopping by and hanging out with me today!  I hope my project sparked some ideas for you and you have fun creating.  Don't forget to subscribe to my channel so you don't miss out.  See you later!

Much love and Christmas Joy,
Jasmine

Saturday, November 5, 2016

Birthday Shaker Card for Jesus! featuring Infinity Engravings

Hello!  Today's card was built around the IE cupcake chipboard die cut.  I started off by painting the cupcake and with Christmas being right around the corner, thought of a birthday card for Jesus.  I set the cupcake aside to dry while I built the shaker element in the middle.  I die cut the circle frame using two circle dies and die cut the back piece using the larger of the two circle dies.  I ran out of acetate panels that I would normally use for the window, so I die cut the circle window out of a stamp storage pocket instead.  After running the circle frame through an embossing folder to give it some texture, I blended some gold pigment ink over the texture and applied 1/4" scor-tape to the back.  Using doubled up foam tape, I cut it half lengthwise and applied it to the perimeter on the back of the assembled window piece.  This is much easier to do after removing the release paper.  With a piece of gold foil cardstock, I used the Stacked Stars die by SSS and ran it through my die cutting machine.  Save a few of the stars from the die cut pieces.  Glue the star outline to the back circle piece and trim off any excess.  I used the Purple Velvet sequin mix from Little Things for my shaker bits and added a few to the middle of the back piece.  Carefully line up the window piece with the backing piece and adhere together to create the shaker element.  The sentiment and letters are die cuts and both dies are by Lawn Fawn.  Die cut the happy birthday from black glitter paper and the letters from gold foil paper.  The snowflake background can be done two ways.  You can use either several individual snowflake stamps or a large background stamp.  You can use either a glue pad or a heat and stick embossing powder to adhere the glitter to the images.  I used the Tsukineko Essential Glue pad and a large background stamp for my card.  With the glue pad, you want to let the glue dry for 10-20 minutes before you apply the glitter.  I used Elizabeth Craft Designs Silk Microfine Glitter, which you need to burnish into the glue to get the shine to come up.  At this point I had all my elements ready to assemble my card.  I used scor-tape on the back of the shaker element to attach it to the cardbase.  I used scor-tape on the back of the cupcake to attach it to the shaker element and glue on the back of the die cut sentiment and letter to adhere them.  After all the instructions, here is the link to my video tutorial on my YouTube channel.

Supplies:
Infinity Engraving cupcake chipboard
Dylusions White Linen acrylic paint
Folk Art 227 Bright Green acrylic paint
Martha Stewart Crafts Multi-surface Glitter paint
Lawn Fawn Claire's ABC's dies
Lawn Fawn Happy Birthday border die
Lawn Fawn Stitched Circles die
Sizzix Circle die
Simon Says Stamp Stack Stars die
DCWV Foiled Stack in gold
DCWV black glitter paper
Delicata Golden Glitz pigment ink
3M Foam tape
We R Memory Keepers Basketweave 3D embossing folder
Elizabeth Craft Designs Silk Microfine glitter in Amethyst
Tsukineko Essentials Glue pad
Avery Elle Storage pocket
Little Things Purple Velvet sequin mix
Hero Arts stamp S5069 (Snowflake)
Neenah Solar White 110lb cardstock
Spectrum Noir clear sparkle pen

Thanks for sticking with me through this long post!  Check out the video if you want to see more in depth the process of making a shaker card.  They aren't difficult at all, but can take a little time.  I don't mind spending the time on people I know will love something like this; my nieces and nephews love these and always want to take them to school.  This design is perfect for any winter birthday, Christmas cards, miss you or thinking of you; all you would have to do is change the sentiment and name (of course ;).  The kiddos would love to help paint the cupcakes, too. 

Much love,
Jasmine

Monday, August 29, 2016

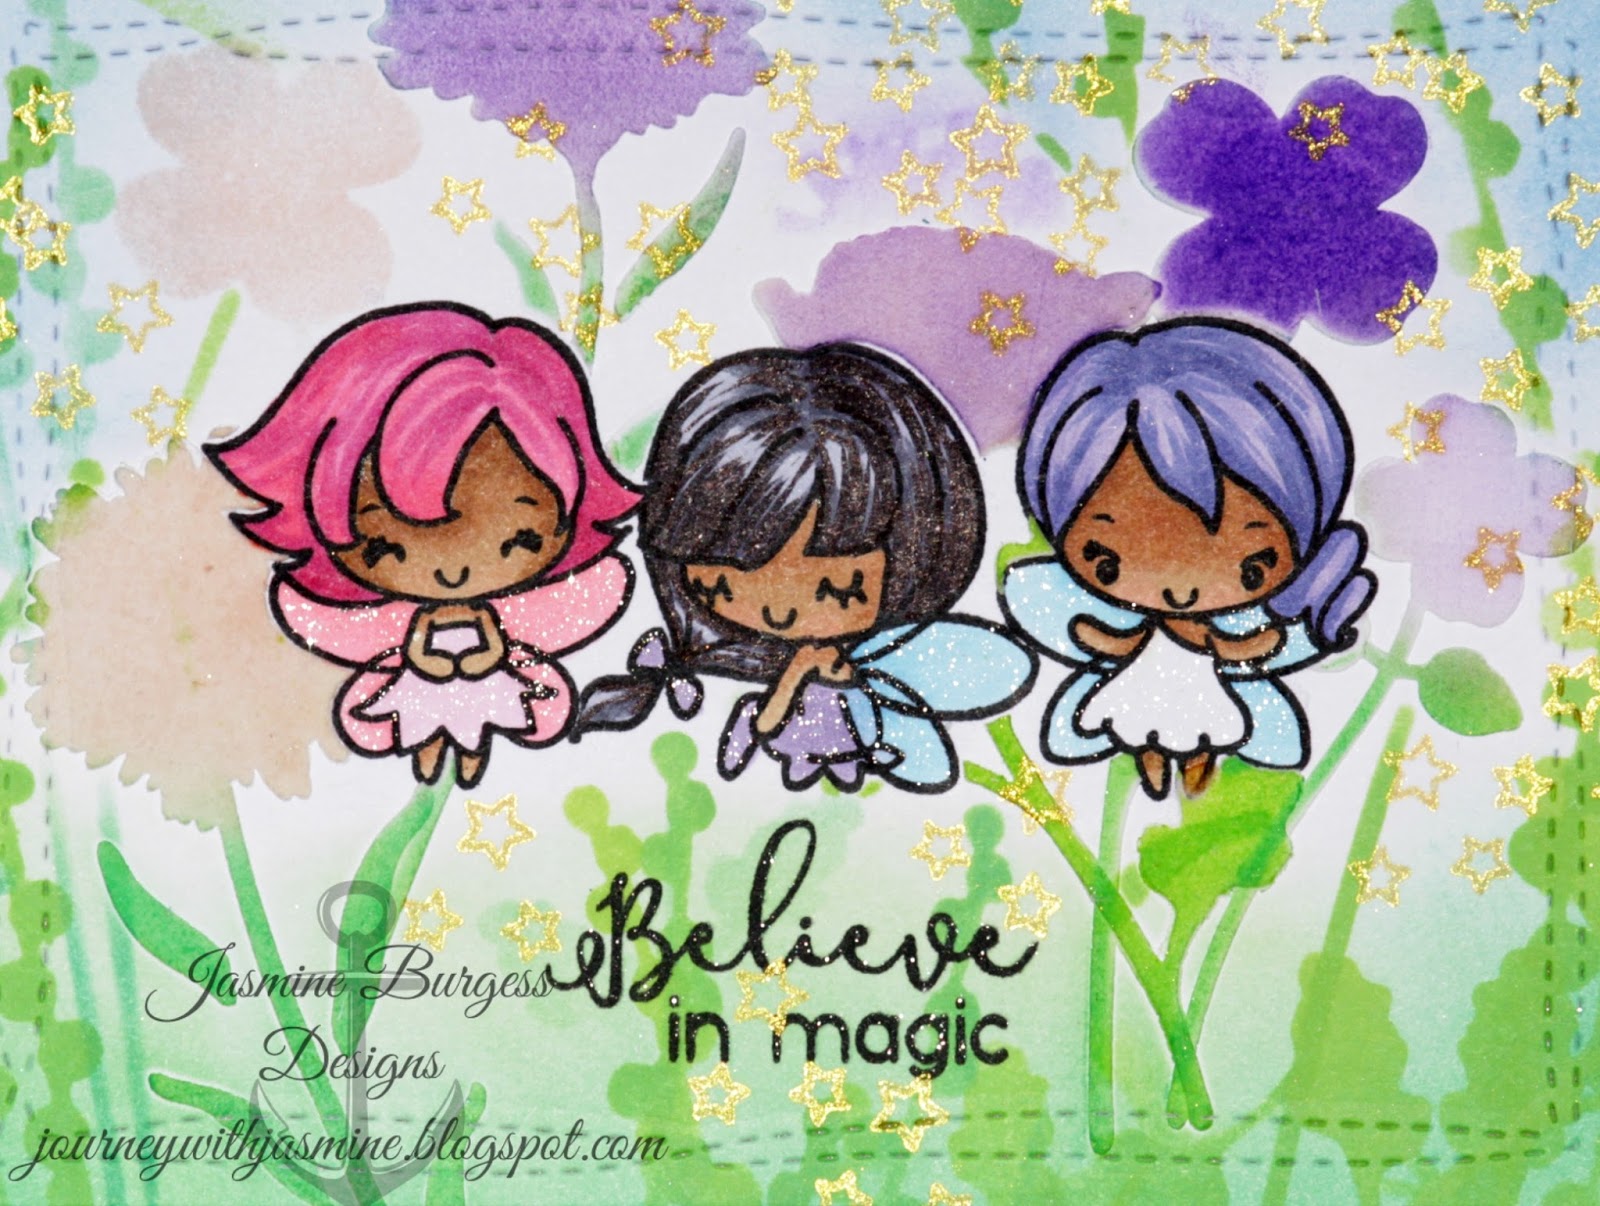
Textured and Ink Blended TGF Little Fairies

 Hello!  Todays card was inspired by The Greeting Farms Little Fairies stamp set and my nieces upcoming 2 year birthday.  My mental image was fairies playing in a wildflower garden, so I started with my three fairies and built the background around them.  Texture paste adds dimension and allows the fairies to appear further set into the background.  I used Copics to color my images and Distress inks for the stenciled features as well as the background.  Here's the video on my YouTube channel if you'd like to watch my process and learn how to use these techniques in your own projects.

Supplies:
The Greeting Farm Little Fairies
My Favorite Things Wildflowers Stencil
Ranger Texture Paste
Memento Tuxedo Black ink
Post-It Notes (masks)
Distress Inks: Tattered Rose, Spun Sugar, Wilted Violet, Twisted Citron, Lucky Clover, Salty Ocean
Avery Elle Wonky Stitches Dies
DCWV Glitter paper (light pink)
Delicata Golden Glitz ink
Wink of Stella Clear
Scor-tape
Copics: Skin (E31, 33, 35) R20  B00, 02  BV00, 02, 04
Pink Fairy:
Wings: RV 21, 23 Dress: RV 10 Hair: RV 13, 14, 17
Other 2 wings: B00, 02
Purple Hair: BV02, 04, 11
Black Hair: C1, 5, 7, 100

I have another video comparing texture pastes here: https://www.youtube.com/watch?v=T9IUMmLcNWM

Thanks for stopping by and hanging out with me today!  Let me know what you think or if you have any questions.

Much love,
Jasmine

Friday, August 12, 2016

Neat & Tangled Bible Journaling Series Card 3 with TupeloDesignsLLC

Welcome back to the third installment of my Neat and Tangled Bible Journaling Card series with TupeloDesignsLLC.  My favorite part about this card is the way the stenciled ink blending in the top left corner turned out.  The imagery and message are just lovely in this versatile and simple card.  This design can easily be used for birthdays, encouragement, thinking of you or recognition and it's gender neutral, making it a great masculine card.  Here is the link to the video tutorial on my YouTube channel and below, you'll find all the supplies with links.

Supplies:
Neat & Tangled Bible Journaling
Neat & Tangled Easter Journaling
Avery Elle Wonky Stitches Dies
Momento Tuxedo Black Ink
Delicata Golden Glitz ink
Cloud Stencil
Distress Ink: Salty Ocean
Altenew Crisp Dye Ink: Buttercream
Altenew Crisp Dye Ink: Warm Sunshine
Tim Holtz Rays stencil
Mini Ink Blending tool
Neenah Solar White 110 lb cardstock

Thanks for stopping by to hang out for a bit!  Be sure to let me know what you think or if you have any questions.  Catch you on the flip side!

Much love,
Jasmine

Friday, June 10, 2016

Heaven Sent Vellum Shaker with Tupelo Designs LLC

 Hello!  Todays card is a whimsical, up-lifting shaker card, utilizing vellum with an ink blended background, sequins and wink of Stella for a sparkling night sky. Here's the link to the video at my YouTube channel.  Let's get started!

Supplies:
Concord and 9th Written in the Stars stamp set
Versamark
White embossing powder
Circle die
Distress Inks: Chipped Sapphire, Mermaid Lagoon,
Wilted Violet, Blueprint Sketch, Black Soot
Stampin Up Vellum
Delicata Golden Glitz
Doodlebug Sequins
Pretty Pink Post Sparkling Clear 4mm
Little Things Ivory
Iridescent sequins
Fun Foam
Scor-Tape - 1/8", 1/2"
SU Blackberry Bliss card base
liquid glue

Thanks for stopping by and hanging out with me today!  If you have any questions, leave them in the comments and I'll be happy to answer them.  Be sure to let me know what you think and if there's something specific you'd like to see.  Til next time!

Much love,
Jasmine

Thursday, May 5, 2016

Your Hearts Desire Blog Hop with Laura's Loft

Hey lovelies, welcome to the Your Hearts Desire blog hop with Laura's Loft.  We have tons of awesome projects to share with you, not to mention a giveaway, a killer 35% off sale at the shop and as always, $10 off a purchase of $75 or more from the shop, from 5/5/16 to 5/15/16.  I don't know about you, but I will be taking advantage of that wicked awesome sale!! :)  More details are at the bottom of my post.  You should arrived here from the delightful Deana's blog, but if you want to start from the top, here's our fearless leaders Laura's blog.


My first project I have to share was an experiment that turned out to be just awesome.  I was quite pleasantly surprised at how well the inks worked together and LOVE the contrast they created.
Supplies:
Neenah Solar White 110 lb cardstock
Simon Says Stamp Blue Violet cardstock
Altenew Peony Bouquet stamp set
Altenew Painted Inspirations stamp set
Altenew Shades of Purple ink set
Altenew Cool Summer Nights ink set

Delicata Golden Glitz ink pad
Post-It notes (for masking)
Scor-tape (or other adhesive)
Avery Elle Wonky Stitches die set
Sizzix Inksheets in Gold
Sizzix Inksheets Transfer pad
VersaMark ink
WOW Gold Superfine EP
Stampin Up Tempting Turquoise cardstock

Peony Bouquet by Altenew is a layering stamp set.  That means that the image is built by layering each image over the previous one in a sequence.  Many come with instructions printed on the packaging, but they are all fairly simple to figure out.  You start with the lightest ink and work towards the darkest.  This card was a bit of an experiment because the gold ink I used is pigment ink and the purples are dye inks and I didn't know how the dye ink would sit over the pigment, but was pleasantly surprised as it turned out beautifully.

Start with Delicata Golden Glitz followed by Deep Iris and Midnight Violet, in that order.  Mask off the flower and stamp leaves in the following order: Ocean Waves, Dusk, and Desert Nights.  If desired, add smaller bloom off the original flower, using the same inks in the same order.  Run the piece through the die cut machine using the ink transfer sheet and pad- this allows you to use dies as if they were stamps.  I used the largest frame in the Wonky Stitches die set.  I used it once with the ink sheet and again as a die, so it gave a double stitched look, which I thought was really cool.  Then, I fussy cut along the edge of the bloom and leaves.  Set that aside for a minute while we stamp on the blue violet panel.  I added two gold outline peonies; I stamped a full one and masked it, then stamped a second one to look like it was behind the first one and underneath the white fussy cut piece.  I also added a gold leaf outline to line up with the stamped leaves on the white panel.  Before mounting them together, rub the gold ink pad over the edges of both panels and let dry for a few minutes.  The sentiment was stamped in VersaMark and heat embossed with WOW Gold detail embossing powder.  I mounted the white corner piece flush with the corner of the blue panel.  Adhere to a turquoise card base and the card is complete.

This card was a lot of fun to create and gave me a chance to practice my Copic coloring.  It's a shaker in a little bit of a different style with the layered and inked vellum.  Let's get started.

Supplies:
Neenah Solar White 110 lb cardstock
SU Vellum
DCWV Silver Glitter cardstock
Spectrum Noir cardstock (or other Copic friendly cardstock)
Lawn Fawn Fairy Friends stamp and die sets
Lawn Fawn Critters Ever After stamp and die sets
Lawn Fawn Puffy Cloud Border die set
Avery Elle Wonky Stitches die set (I use this set of dies constantly)
Avery Elle Stamp Pocket
WRMK 3D Gemstone Embossing Folder
WRMK Fuse Tool
Momento Tuxedo Black
Design Creative Bling sequins in Glacial Bliss and Raspberry Crush
Little Things sequin mix in Iridescent White
Simon Says Stamp inks in Hot Mama and Blue Jay
Delicata Silvery Shimmer ink
Scor-tape - 1/4 and 1/2 inch widths

First, stamp and color the images on Copic friendly cardstock using a dye-based black ink.  I used Spectrum Noir cardstock and Momento Tuxedo Black ink and colored with Copic markers.  I always stamp multiples of my images just in case.  Die cut all your images after they're colored and set aside.  Cut a panel of Neenah 4.25" by 5.5".  Using the largest of the Wonky Stitches frames, run through your die cutting machine.  Place the smaller of the frames, center it in the middle of the die cut panel and run it through again.  This will create a frame.  Place the frame in the embossing folder and run it through the machine.  Using an ink blending tool and SSS Blue Jay ink, add ink to the frame using a really light hand so that you can emphasize the texture added by the embossing folder and avoid any damage to the frame.  Lightly buff some Silvery Shimmer ink over the blue and set aside to dry (mine was dry in 10 minutes or so).  Plug in the Fuse tool; it takes about 15 minutes to get hot.  Grab a stamp pocket and turn the frame over to the back.  Line up the stamp pocket seam with the outside edge of the frame and mark where to add seams with the Fuse tool using a permanent marker.  I like to leave 1/4" allowance beside the seam of plastic to add my adhesive to so that the seams won't show in the finished product. After I mark where I want the seams, I trim off the excess stamp pocket outside the seam allowance and make one seam.  Add about 1/2 teaspoon of each sequin mix to the pouch- you don't want to over fill it so that it is too thick and the shaker bits don't have room to move around.  Add the final seam and shake around to make sure everything is sealed.  The worst thing is having everything put together and having sequins and shaker bits falling out! (Ask me how I know! Haha)

On to the vellum.  Using an ink blending tool, I inked the vellum about 3" high and 5" wide using the blue ink and cut the section off using scissors.  Repeat with Hot Mama.  Die cut each inked section with one of the Puffy Cloud dies and trim edges to fit behind the frame.  Using a scrap of vellum and the banner die from the Wonky Stitches set, I stamped the sentiment in black and die cut it.  Make a top folding card base and add the Blue Jay ink around the perimeter.  Now we are ready to assemble.  I like to dry fit everything together until I like it and take a picture with my phone as a reference.  When you're considering what ink colors to use, remember that the vellum will sheer out the color; it wont absorb into the paper is it would regular cardstock.  The ink will dry quickly, but it will sit on the surface and remain sheer so choose bold colors so that they will be visible in the finished card.

Trim a piece of silver glitter paper to fit the frame; this piece will serve as a background behind the shaker pouch.  Adhere to the card base.  Add 1/4" Scor-tape to the seam allowance on both sides of the shaker pouch and adhere to the silver background.  I worked from the bottom up on my card.  I added 1/4" Scor-tape to the edges of the blue vellum and adhered it to the frame.  Followed up by the pink, adhering it higher so that it looked like layers of colored clouds.  Don't worry about seeing the edges on the front; when you add the characters, you don't see them.  Add Scor-tape to the inner and outer edges of the frame and adhere it to the card base, over the shaker pouch.  The first image I added was the castle to the bottom right corner using foam tape.  The next was the dragon to the top left corner, tucking his butt just under the pink vellum cloud, also using foam tape.  The orange fairy went to the top right corner with clear foam squares.  The blue fairy was tucked into the left edge of the frame, with her feet under the edge of the blue cloud.  I used a clear square under her torso and a bit thicker foam square behind her head to give her dimension.  For the green fairy, I used foam tape and placed her at the bottom left corner.  Before I stuck her down I tucked the left edge of the banner under her, letting it lay across the castle.  I used a clear foam square under the right end and placed a silver foil die cut heart over the foam square to disguise it.  I added a couple more foil hearts for continuity around the rest of the card.  To finish up, I added clear Wink of Stella to the fairies and dragons wings, the dragons horns and spikes and flags over the castle.  Done!

I know the other artists in this hop have awesome projects too, so don't forget to leave some love on EVERY stop so that you'll be entered to win our sweet prize pack that I picked out myself (but that's a well guarded secret, so don't tell anyone ;)  Also, just a reminder that the ENTIRE shop is 35% OFF from 5/5/16 through 5/15/16 and the coupon code is $10off75. So just in case you don't win, you can pick up all those goodies and more for cheap!


Next up is Robbie's blog and just in case you get lost or want to visit again, the complete hop list is below.
1. Laura -  http://www.lauralscott.com/your-hearts-desire/
2. Deana Benson -http://www.designcreativelybling.com/2016/05/your-hearts-desire-with-lauras-loft.html
3. Jasmine Burgess - You're here!
4. Robbie Rubala -http://inkedx2.blogspot.com/search/label/LL
5. Emma Hall - http://heartofcraft.blogspot.com/2016/05/your-hearts-desire-with-lauras-loft.html
6. Lisa - http://royalpumpkinart.blogspot.com/2016/05/your-hearts-desire-shop-hop-with-lauras.html

Much love,
Jasmine


Friday, April 29, 2016

Gorgeous Gold and Purple Altenew Peonies


Hey guys! Welcome!  Today's post is my entry into the Altenew Inspiration Challenge for April 2016.  Below is the Challenge image and the idea is to make a project using Altenew products, pulling inspiration from the image; so colors, textures, patterns or vibes.  I chose to use the dark blue-violet, gold and teal as my inspiration; not only are they my favorite colors, but also loved the high contrast and bold imagery.
 

Here is my project I created using Peony Bouquet and Painted Inspirations stamp sets as well as 3 of their ink cube sets: Shades of Purple, Cool Summer Nights and Green Fields.  Lets get started!

Supplies:
Neenah Solar White 110 lb cardstock
Simon Says Stamp Blue Violet cardstock
Altenew Peony Bouquet stamp set
Altenew Painted Inspirations stamp set
Altenew Shades of Purple ink set
Altenew Cool Summer Nights ink set
Altenew Green Fields ink set
Delicata Golden Glitz ink pad
Post-It notes (for masking)
Scor-tape (or other adhesive)
Avery Elle Wonky Stitches die set

Peony Bouquet is a layering stamp set and it's fairly easy to figure out the sequence with which to stamp.  If you have a MISTI, or other stamp positioning tool, that does make it easier to get perfect alignment, but these sets are still beautiful when you don't get them perfectly lined up.

Altenew_Inspiration Challenge_April
For the flower in the bottom left corner, I used Lavender Fields, Deep Iris and Midnight Violet, in that order.  You want to stamp lightest to darkest.  After my flower was stamped, I added the outline in Delicata Golden Glitz.  With a mask over the flower in place, I added the tealy-blue leaves and green stem.  For the leaves, I used Ocean Waves, Dusk and Desert Night, in that order, stamping lightest to darkest.  With the flower on the right edge, I used Soft Lilac, Lavender Fields, and Deep Iris, in that order.  I wanted a bit of contrast between the blooms, while staying in the same color family.  The leaves and stems are the same ink colors.  I used Forest Glades for the green.  The small outline bloom in the top left corner is Deep Iris.  The sentiment is from the Painted Inspirations stamp set and stamped in the same Golden Glitz ink.  Because Delicata is a pigment ink, it will stamp over dye inks and maintain it's opacity without needing to be heat embossed.  When all the stamping was complete, I used the largest of the frames in the Wonky Stitches die set to add the stitching detail around the perimeter, mounted it to a mat of blue-violet cardstock and adhered that to a standard top-folding cardbase.  That wraps up our card! I really love how this one turned out.

I hope you had fun and learned something new!  Feel free to ask questions and let me know what you think!

Much love,
Jasmine


Saturday, April 9, 2016

Mardi-Gras Inspired Mini-Canvas

 Welcome and thanks for stopping by!  Today's canvas is one I'm crazy about and I can't wait to share it with you!  The impetus to this design was the top hat shaker from Infinity Engravings.  

I had some new sequins sitting on my table, next to a naked top hat shaker to be.  I began to play around with color and elements and this is what came out of it.  The top hat is 5 layers of chipboard, all with a hole cut in expect the bottom layer.  Theres an acetate piece, also a top hat shape that sits between the top two layers to seal in the shaker bits.  I traced a scrap of black glitter cardstock to fit on the bottom layer so the bare chipboard wouldn't be visible through the shaker window.
I used Glossy Accents to glue each layer together because it's strong, dries fast and clear, and doesn't remain sticky after it's dry.  The top layer is etched with the lines that you'd see in a top hat- those lines remained visible after three layers of embossing powder, which is impressive and adds to the elegance of the piece.  Let's get to how I achieved the silver filigree.
Supplies:
VersaMark embossing ink
Black detail embossing powder
Silver pigment ink- Delicata Silvery Shimmer
Large filigree stamp - having a wood mount stamp will make it easier
Heavily ink a large filigree stamp.  Cover the top layer in VersaMark.  Cover with embossing powder and heat to melt.  Repeat the process two more times; while the third layer is still warm, press stamp onto the chipboard and lift off.  Let cool.  Glue bottom four layers of die cut together.  Add shaker bits.  Glue acetate in place and top with the final stamped layer.  Add feathers and roses.  Top hat is complete. 


I covered the canvas in printed tissue paper using gel medium as a glue.  Once dry, I added my acrylic paint.  I used Dina Wakely heavy body Acrylics in Blackberry, Magenta and Lemon.  I blended between the colors using my brush, so even though I only used 3 colors of paint, it looks like I have 5 colors.  After my paint was dry I added some texture with a stencil, texture medium, glitter and pigment powders.  I mixed two shades of green to add variety and depth to the composition.  Scoop 2 piles of about a teaspoon each of the texture medium.  Add glitter to both and each a different shade of pigment powder.  The ones I use are Magicals by Lindy's Stamp Gang, Mad Hatter Mint Green and Merry Go Round Green.  Smooth over stencil in an even layer, remove stencil and let dry. 

Wash stencil and palette knife immediatly, so the medium will ruin them if allowed to dry on there.  After it's dry, re-apply stencil and add a layer of gel medium.  Add seed beads and press into medium- this adds color and texture.  Let dry.

I used paper roses from Wild Orchid Crafts in a variety of sizes and colored them using ink sprays.
Purple: LSG Royal Amethyst Fire
            Dylusions Crush Grape
Blues: LSG Royal Emerald Fire
           LSG Hydrangea Blue
           Dylusions Polished Jade
           Distress Spray Stain Mermaid Lagoon
All the metal elements are from The Paper Studio "Spare Parts".  The Journey wood die cut is from my stash and I used the same technique as the top hat, without the filigree stamping: two layers of heat embossing with LSG Midnight Violet embossing powder.  The top hat, wood piece, roses and feathers are adhered using hot glue.  The metal elements are adhered using E6000; it's stinky, but the only glue I've found that holds on to metal. 

I hope you've enjoyed your time with me today! Feel free to ask questions and I'd love to know what you think!

Much Love,
Jasmine

Wednesday, March 2, 2016

Tweet Me A Song

Happy Spring!  Today's card was inspired by the birds I heard chirping at the bird feeder, a sound I've loved since I was little.  I used a holiday set by Altenew called Winter Cardinal and by changing the colors from reds to blues, I created a Blue Jay instead of a Cardinal.  You could use yellows to create a Cedar Waxwing.  Let's get started.
Supplies:
Altenew Winter Cardinal Stamp set
MISTI
Neenah Solar White 110lb cardstock
Wplus9 Oatmeal cardstock
BARC Wood Paper
Lawn Fawn Stitched Rectangle dies
Memory Box Branch die
Inks:
-Simon Says Stamp Slate, Dark Chocolate
-Lawn Fawn Deep Sea, Fish Tank
-Momento Bahama Blue, Danube Blue
-Distress Ink Squeezed Lemonade (set #10), Tumbled Glass (set #8), Blueprint Sketch (set #14)
-Delicata Golden Glitz
White Fun Foam
Tombow Mono Multi liquid glue
1/2" Scor-tape
Little Things sequin mixes in Warm Golden Glow and Mountain Lake

Step 1)  Using the largest two Stitched Rectangle dies, cut two panels of Oatmeal cardstock.  Using the MISTI, start the stamping with the branch in Dark Chocolate ink.  Next, stamp the feet using Slate ink.  Now for the body of the bird.  This is a layering stamp set, and it's easy to know which to stamp first.  The first layer to stamp is the body in Momento Bahama Bay ink.  The second layer is in Lawn Fawn's Fish Tank ink.  The third layer is in Momento Danube Blue and the fourth and final layer is in Lawn Fawn Deep Sea.  If you get any spotty stamping, just reink and stamp again (this is where the MISTI comes in handy). 

Step 2)  Using an ink blending tool, add Squeezed Lemonade over the top right corner of each panel and Tumbled Glass around the rest of the panel.  Add Blueprint Sketch around the Tumbled Glass, just along the edges for some depth. 

Step 3)  Add scor-tape to the back side of the larger inked panel and adhere to a card base.  Cut a piece of fun foam slightly smaller than the bird panel and add scor-tape to both sides.  Remove backing paper from one side and adhere to the back side of the bird panel. Remove backing tape and centering the bird panel, adhere to the larger inked panel. 

Step 4)  Cut branch from wood veneer paper using the branch die.  Adhere over the stamped branch using liquid glue.  Pull out three gold sequins of varying sizes and two blue sequins of different size.  Adhere with liquid glue in the top left corner.  Our card is complete!

Thanks for hanging out with me today! Let me know if you have any questions and I'd love to know what you think!

Much love,
Jasmine

Friday, February 12, 2016

Infinity Engravings Mixed Media Romance


 Hello! Todays project has a romantic vibe and can be made into a wall hanging or add an easel foot to the back for a shelf.  This was a lot of fun to make and challenged me to use more products in my stash.  To the right is several of the products I used, but I didn't use everything I thought I would.  Lets get started!  I used a few sprays on my hearts and romantic couple pieces to color them.  I did not gesso them first.  For the hearts and umbrella I used Heidi Swapp Color Burst spray in Raspberry and Fireworks Lilac Posies.  For the rest of the couple die cut I used Heidi Swapp Color Burst in Tinsel and Lindy's Stamp Gang Midnight Raven Rendezvous.

 First, I cut a large piece of Tim Holtz Tissue paper in Melange and adhered it to the chipboard bookmark with Prima Art Basics Soft Matte Gel.  I use a large paintbrush to add the medium to the chipboard, about 1/3 at a time, smoothing the paper out as I go.  To keep it flat while drying, I place heavy objects on each end and leave it to dry for at least an hour.  After it was dry, I trimmed the excess paper off using scissors and a craft knife. 
 I wanted the words "I choose you" along the side of my project.  I started with "choose" in the middle, taping down the stencil with painters tape (because it's low tack and won't tear the paper).  With a palette knife, a scooped out two little globs of modeling paste, about a teaspoon each.  I added a tiny bit of Lindy's Stamp Gang Magicals Pigment powder to each pile; one pink (Raspberry Lemonade) and one purple (Pop Rocks Purple).  Mix each pile into a uniform color.  Start with less pigment powder and add a tiny bit more if you want to darken the color.  By tiny bit, I mean the size of a pin head.  A little bit goes a long way.  I added pink to the left side of the word and purple to the right side, meeting in the middle to blend the two colors a tiny bit.  Remove the stencil and let dry for about 30 minutes, washing the stencil and palette knife immediately; the paste will ruin the stencil and knife if left to dry.  After "choose" was dry, I mixed up two more globs of color and added "you" in purple and "I" in pink and let dry.  To add a bit of background detail, I stamped a large flourish stamp in Silvery Shimmer Delicata pigment ink and let dry for 10 to 15 minutes.
  

 To adhere the couple die cut to the bookmark, brush on some matte gel to the back of the die cut a little thick.  I weighted the die cut down with my wafer thin die cases so that it dried flat.  I left it overnight.
I used the same Raven spray lightly on the rose on the girl.  The hearts were cut with Simon Says Stamp Mini Hearts Outlines dies using DCWV Glitter Paper, Foiled Cardstock and Doodlebug white glitter paper and adhered with Stick-It adhesive.  


I used E6000 glue to add any metal pieces to the project.  I'll warn you that it smells awful; use it with a window open or fan on.  It's the only glue I've found that's permanent on metal, including hot glue.

I started with the Key from Tim Holtz and the acrylic rose from my stash.  I attached the rest with hot glue.  The roses are Wild Orchid Crafts and the buttons are Stampin Up.  The roses are colored with a few sprays: Fireworks Grape Jelly and Lindy's Royal Amethyst Fire; Lindy's Pretty in Pink and Royal Amethyst Fire. 
I really enjoyed the process of creation for this project and so pleased with how it turned out.  All the chipboard die cuts and bookmark are from Infinity Engravings and are so much fun to work with.

Feel free to ask questions and let me know what you think.

Much love,
Jasmine

Handmade Christmas Series 2018: Day 1 Watercolors and EH Mondo Holly 2 ways

Here's an exciting sale for everyone!  ellenhutson.com is having a 20% off sale on all dies with the code above.  I...