Showing posts with label DCWV. Show all posts

Thursday, February 22, 2018

Watercolor Emboss Resist Birthday with Moody Unicorns

 Unicorns and birthdays are best friends, so I decided to put them together in honor of one of my besties, Jen.  We met in college, became best friends and never looked back!  I started by making my own patterned paper by randomly stamping and heat embossing the larger unicorn images followed by filling in with the smaller images in the stamp set, the cupcake and little present.  Using watercolors to add pops of brightness helped each image stand out without looking overdone and the die cut sentiment finished things off nicely.  I chose a foil paper for my sentiment because it adds a contrasting finish and texture, which adds easy interest.  Here's the video tutorial and supplies are listed below!  Happy Birthday Jen!!

Supplies:
Gerda Steiner Designs Moody Unicorns
Canson XL 140 lb watercolor paper
MISTI
Versamark
Lindy's Stamp Gang Silver Moon Orchid EP
Gansai Tambi watercolor palette
Silver Black Velvet brush #8 round
My Favorite Things Wonky Stitches die
DCWV Foil and Glitter papers
Lawn Fawn Happy Birthday die
Tombow Mono Multi glue
Be Creative tape

I hope you enjoyed todays post and project and that you enjoy good friendships like I am blessed with.  Happy crafting and God bless!

For Christ's glory and much love,
Jasmine


Friday, February 16, 2018

Penguin Watercolor Ombre Emboss Resist with Gerda Steiner Designs

 Hello and welcome everyone!  Today we are playing with those sweet Valentine Penguins from Gerda Steiner Designs again.  This time, we are creating our own patterned paper with heat embossing.  Add some simple watercolor and viola.  We have an adorable and versatile panel that is perfect for so many different occasions.  The same technique can be used for almost any stamp set in your aresenal as well, so bust them out and get creative.  Here's the video on my Youtube channel and my supplies are listed below.

Supplies:
Gerda Steiner Designs Valentine Penguins
Canson XL Watercolor paper
Versamark
Brutus Monroe Icicle embossing powder
MISTI
FineTec watercolor pallete
Gansai Tambi 36 watercolor palette
Silver Black Velvet brushes
My Favorite Things Wonky Stitches die
DCWV Glitter Paper and Foiled Vellum
Sizzix Hearts die
Lawn Fawn Scripty Love die
Tombow Mono Multi glue
Stitck-It Sheet adhesive
Be Creative tape

I hope you're having a great day and I encourage you to step out of your comfort zone to try new techniques and new products, stretching your creative muscles.  It's so much fun and good for you too. 

I love interacting with you guys, so leave me a comment or question and I'll be happy to help.  Have an awesome day and I'll see you next time!

For Christ's glory and much love,
Jasmine


Monday, February 12, 2018

Save the Crafty YouTuber Video Hop

The quick and dirty of it is that YouTube changed their perimeters for how people earn money with their channel.  Starting 2/20/18 if your channel doesn't have at least 1k subscribers and 4k hours of view time over the past year, you will lose monetization eligibility, meaning that YouTube will no longer pay creators who fall short of the new perimeters for advertising on their content.  Once their threshold is reached, they may apply for review to restore or gain monetization (but they make no promises).  So Justine Hovey (bless her) decided to organize a blog hop with many of the smaller channels and the more well known ones to introduce us smaller names to more viewers and many of the companies we love joined her to sponsor and donate prizes.  Every single video on the hop has multiple prizes to give away.  I am BLOWN AWAY by kindness and generosity of everyone involved and it demonstrates the love and consideration we can have for the people around us; people we've never met.  There are over 50 videos and channels in the hop and I know that's a lot.  However, the more videos you watch, subscribe to and comment on, the better and better your chances are to win.  I have a $25 gift card to simonsaysstamp.com and 2 Catherine Pooler ink pads to give away.  If you haven't tried her ink pads yet, you should because they're awesome and her colors are killer.

 If you are unsure with how YouTube works, every single like, comment and minute you spend viewing a video helps that channel, so if you want to support a certain artist or crafter on YouTube, subscribe, comment, share and like the videos.  I can promise you it means the world to us when we hear from you about a video or technique or product.

Ok, enough business, let's get onto the fun!  I have an easy, fun and fast technique for you today that is a play on ink smooshing.  We are going to play with Alcohol Inks and make watercolor look backgrounds to put behind a Peony die cut.  You can do this with any colors you like, including the metallic mixatives and there are a variety of die cuts on the market that this will work with.  Here's the video on my YouTube channel.
Here's what I used:
PaperTreyInk Peony Cover plate die
Ranger Matte Cardstock
Ranger Alcohol Inks:
Indigo/ Denim/ Sky/ Snowcap
Botanical/ Lettuce/ Teal
Flamingo/ Sunshine/ Sunset/ Purple Twilight
Ranger Alcohol Ink Blending Solution
DCWV Glitter and Shimmer stacks
Stick-It Sheet Adhesive
Sizzix Shimmer paper
SSS Small Hello die
SSS Blessed die
Mama Elephant Smile die
Scor-tape 
Neenah 110lb Cardstock

The complete hop list is here and winners will be posted there as well.  The next stop on the hop is Monica, so head over to her channel to see another awesome project and another chance to win one of the prizes.   Thanks so very much for stopping by and I'll see you next time! 
For Christ's glory and much love,
Jasmine


Monday, November 27, 2017

Handmade Christmas 2017: Joy to Light Up Your World using Concord & 9th and Chibitronics

  Joy is an emotion that a lot of people struggle with, so I wanted to create a design that was simple.  Joy is not the same as happiness or excitement.  Joy is what loving memories are made of.  Joy is created when you take the time to slow down and immerse yourself in the moment, taking stock of those you love and those that love you.  Joy is a gift from our Triune God and it persists through pain or lonliness or grief.  Christmas is celebrated by many different traditions and cultures around the world, but what links them together is the gift that was made available through the birth of the Savior Jesus Christ.  That, if nowhere else, is where our Joy can be found and embraced. 
   Yes, it lights up!  How fun is that!  Todays project is a light up using vellum in order to let a little more light show through and it's so pretty.  I've been having so much fun using the Chibitronics circuit builder set because it really is easy and allows you to create such fun and interactive cards.  I chose Teal and Gold for this card because I wanted to do a mix between traditional and festive with the colors and they look great together.  Here is the link to the video on my YouTube channel showing you step by step how to recreate this card at home or, better yet, take your own spin on it.  My supplies are listed below.

Supplies:
Concord & 9th Joy S&D
MISTI
DCWV Shimmer stack
Vellum
Scor-tape
Delicata Golden Glitz ink
Avery Elle Wonky Stitches die
Chibitronics set
3M Foam tape
Versamark ink
Simon Says Stamp Ultrafine Antique Gold EP
Neenah Classic Cream cardbase
White cardstock

Thanks for stopping by!  Let me know if you have any questions (about cards or Jesus ;) )

Merry CHRISTmas,
Jasmine

Friday, November 24, 2017

Handmade Christmas 2017: Scraps and Die Cuts

 As you may have noticed, there's no stamping in todays cards.  It's all scrap papers and die cuts so we not only use up otherwise unusable excess, but also give ourselves a creative stretch.  I have all sorts of different papers in these cards; glitter, foil, patterned paper, wood veneer, velvet and shimmer.  To add interest and flair, mix up your finishes.  Varying the textures also gives depth and dimension to the finished product.  You also want to pay attention to widths.  Place wide pieces next to skinny pieces so that you draw the eye and add interest.  You can make these any size too.  I went with the standard 4.25" x 5.5", but the size is only limited by the length of your scraps.  This technique also works for absolutely any occasion and it's perfect for guy cards.  I have strips as thin as 1/8" and as wide as 3/4".  I used my paper trimmer to cut strips down and trim off any torn or crooked edges.  Here is the link to the video tutorial on my YouTube channel and my supplies are listed below.
Supplies:
DCWV papers
  • glitter
  • foil
  • shimmer
Doodlebug
ARC wood veneer paper
MemoryBox Snowflake Border die
Simon Says Stamp Merry Christmas die
Simon Says Stamp Christmas Blessings die
Neat & Tangled Happy Holidays die
Sizzix TH Alterations Reindeer Flight die
Stick-It sheet adhesive
Scor-tape
Tombow Mono Multi glue
Snowflake dies
White cardstock, cut to 4.25x5.5"
Neenah Cream cardbases
 I hope you're enjoying some creative time and get the opportunity to give yourself a creative stretch to try this technique out.  It's really easy and a great way to create quick yet beautiful cards and use up some leftovers in the process.

Merry CHRISTmas and much love,
Jasmine


Friday, November 17, 2017

Handmade Christmas 2017: Easy Watercolor cards with Koi and Fine-Tec Metallics

 It's the fourth post in my Handmade Christmas 2017 series and I have 4 easy watercolor cards that are perfect for mass production.  I used 1 stamp set, 3 watercolor palettes and 1 sheet of 9x12 watercolor paper.  You don't have to be a master watercolor artist to make these cards.  If you can move a brush from side to side, you can make these.  Easy peasy. I wanted to keep products to a minimum by using them in different combinations on each card so that you get variety without needing/using tons of different things.

Here is the link to the video tutorial on my YouTube channel and my supplies are listed below.

Supplies (used in each card):
Canson XL 140 lb Coldpress watercolor paper
Hero Arts SD412 stamp set
Archival Jet Black ink
Koi Pocket Feild Sketch watercolor palette
Silver Black Velvet brushes
MISTI
Versamark
Green tree on red mat:
Green tree on Gold mat:
Blue wash on Gold mat
Blue/Bronze on Red mat


 I hope you enjoyed todays post and video.  Watercolors are really quite forgiving and these are a really easy way to get your feet wet ;)  Merry Christmas!

For His glory and much love,
Jasmine

Wednesday, November 1, 2017

Handmade Christmas 2017: Penny Black Winter Fairy with Copics

Hello and welcome to the kick off of my Handmade Christmas 2017 series.  Christmas is my favorite time of the year and I'm always looking forward to the creativity that comes with cardmaking.  The only rules are the ones we give ourselves.
I fell in love with the Penny Black Winter Fairy image because she looks so sweet, innocent and darling; it reminded me of childhood Christmases that were magical and lovely.  I imagine that snowball as her gift to baby Jesus; heartfelt and genuine.
The blue and purple version was a practice card, but I absolutely loved how it turned out and decided to include it in the post.  Copic markers are amazing in the right hands and they're a labor of love, but I'm determined to get better with them.  The blue and purple is in the non-traditional color family while the red and gold is certainly in the traditional realm and both are beautiful.
Here is the link to the video tutorial on my YouTube channel and my supply list is below.

Supplies: Red/Gold
Penny Black Winter Fairy stamp
Memento Tuxedo Black ink
Strathmore Bristol Smooth cardstock
MISTI
Copics:Red/Gold
Hair: E31, 33, 37; YR20
Skin: E50, 51, 21; R11, 20
Skirt: R27, 29, 37, 39, 59
Wings and Snowball: RV0000
Earmuffs and legwarmers: C00, 0, 1; R27, 37, 59

DCWV Foiled Cardstock Stack- Red/Gold
Lawn Fawn Stitched Rectangle dies
Viva Decor Hologram Glitter Pen
Neenah Classic Cream cardbase
SSS Merry Christmas die
Stick-It sheet adhesive
Scor-tape


Blue/Purple:
DCWV Shimmer Cardstock: Pale Blue
Lawn Fawn Stitched Rectangle dies
Spectrum Noir Clear Sparkle Pen
Neenah Classic Cream cardbase
Doodlebug White Glitter cardstock
Stick-It sheet adhesive
Neat & Tangled Happy Holidays die
Scor-tape


Thanks for stopping by to hang out with me.  Let me know if you have any questions; always happy to help.  If you're interested in Copic marker classes, go see Sandy at art-classes.com.  She's got mad skills and so easy to learn from.  Merry Christmas!!

For His glory and much love,
Jasmine

Wednesday, October 18, 2017

A Sweet Halloween with Darcies and Copic

Here is Halloween card #4.  I'll be honest; I struggled with a background for this one and turned to Pinterest and YouTube to see if I could find any inspiration.  I came across a video Sandy Allnock made last year using the same stamp set and totally copied her idea.  (They say imitation is the sincerest form of flattery, right?)  The potion forming a spooky little cloud above the little guys was perfect and simple, allowing the focus to remain on the main images and all the coloring we put into them.  Simple and sweet with just a tiny hint of mystery while being completely adorable.  This stamp set is fairly versatile as well.  You could also use it for Valentines by masking off the bat from the cupcake and hat from the apple.

Here is the link to the video tutorial on my YouTube channel.  Here is the link to Sandy's video too.

Supplies:
Darcies Heart and Home Sweet Halloween stamp set
Memento Tuxedo Black ink
MISTI
Bristol Smooth cardstock
Post-It Removable Tape
Copics:
Apple: YG03, 06/ R24, 27, 29/ E13, 15/ C6, 8
Potion: V12, 04, 05, 17
Cupcake: G14, YG17/ YR15, 04, 07  Bat: C9
Background: V12, 000, C2/ Colorless Blender
Spectrum Noir Sparkle Pen
Lawn Fawn Stitched Rectangle dies
DCWV Glitter paper
Scor-tape
Neenah Classic Cream cardbase

Thanks for stopping by and I hope you have a wonderfully sweet Halloween.

For His glory and much love,
Jasmine

Tuesday, October 17, 2017

Magical Halloween Part Deux with Darcies and Copics


Hey guys, welcome back!  As I said yesterday Halloween being my birthday was so much fun as a kid, but is just another day as an adult; for me, it's getting one step closer to Christmas that's the exciting part.  However, when I came across this stamp set with a Unicorn perched upon a jack-o-lantern, I couldn't resist.  The shaker was originally my practice image, but I loved it so much that I fussy cut it out and mounted it to the front of the shaker window.  I just couldn't let it go to waste.  The green glitter card has a Copic colored background because I wanted to keep the focus on the adorable unicorn.  Just a few sequins to finish it off.  This image is perfect for all the Halloween and Unicorn lovers alike.  I'll be sending these to my nieces; they'll love them!

Here's the link to the video tutorial on my YouTube channel and the supply list is below.

Supplies: (This list is used in both cards.)
Darcies Heart and Home Magical Halloween stamp set
Memento Tuxedo Black ink
MISTI
Strathmore Bristol Smooth cardstock
Copic Markers:
Mane and tail: RV06/ V05, 09/ B04, 06/ G03, 07/ Y13, 18/ YR04, 07
Hide: RV0000, 00, 52/ R20  Hooves: C6  Horn: RV000, 52
Wings: BV0000, 000, 01
Pumpkins: YR04, 15; Y35, 13; R39
Leaves: YR15/ Y17/ YG17/ YG67/ G07
Hat: E21, 33, 35, 40

Green Glitter:
Sky: BG000/ B000/ B01, B12 
Ground: YG67, 17
Spectrum Noir sparkle Pen (Mane, tail and wings)
DCVW Green glitter paper
Lawn Fawn Stitched Rectangle dies
Ranger Muliti Medium Matte
Simon Says Stamp Crystal Reflections sequins

Scor-tape
Neenah Classic Cream cardbase


Orange Shaker:
Paper Studio glitter cardstock
Hero Arts Acetate
3M Foam tape (doubled up)
Scor-tape
Spectrum Noir Sparkle Pen (Mane, tail and wings)
Doodlebug patterned paper
Simon Says Stamp White Pigment ink
Stampendous White embossing powder
Little Things sequin mixes
  • Tangerine Jewels
  • Viola Sequin mix
  • New England Fall sequin mix
Neat & Tangled Scalloped die

Thank you for joining me today!  I hope you get a chance to enjoy fall and all the beauty God gave it.  Happy Halloween!

For His glory and much love,
Jasmine


Monday, October 16, 2017

Magical Halloween with Darcies and Zigs

 Happy Halloween friends!  Halloween is one of those holidays that people seems to love or don't really care about.  For me, Halloween is my birthday and was so much fun as a kid, but is just another day as an adult; for me, it's getting one step closer to Christmas that's the exciting part.  However, when I came across this stamp set with a Unicorn perched upon a jack-o-lantern, I couldn't resist.  I made 3 cards with it in one evening in my studio and the cute factor is unreal.  All three cards will be in 2 videos, so don't forget to hit the subscribe button over on my YouTube channel ;)

Here is the link to this cards video tutorial and my supplies are listed below.
Supplies:
Darcie's Heart and Home Magical Halloween stamp set
Zig Clean Color markers
  • 91 Lt Gray
  • 52 Bright Yellow
  • 23 Scarlet Red
  • 26 Lt Pink
  • 51 Lemon Yellow
  • 40 Green
  • 36 Lt Blue
  • 83 Lilac
  • 47 May Green
  • 28 Pale Pink

Canson XL 140 lb watercolor paper
MISTI
Archival Jet Black ink
Lawn Fawn Deep Sea ink
Paper Studio Purple glitter cardstock
Neat & Tangled Scalloped die
Scor-tape
Neat & Tangled Happy Holidays die
Simon Says Stamp Trick or Treat (Halloween) die
Spectrum Noir sparkle pen
Tombow Mono Multi glue
Scraps of glitter paper

In the video, I used Arches green label watercolor paper, but I think it's too absorbent for the Zig markers, so I listed Canson paper instead.  It's a good quality student-grade paper that works well with the Zig markers and is reasonably priced as well as available at any craft store and online.  Because we're stamping on watercolor paper, which as a bit of a texture to it, you're going to need a MISTI.  I say that because you will need to stamp it several times to get a solid outline and using a MISTI will make that possible.  I've tried re-stamping without it and no matter how sure I was that I was lined up properly, it seldom actually was and I ended up with weird lines.  I am specific to the MISTI because it is a small business and the original inventor of the product.  Other companies have shamefully stolen her design and produced copycats, but I can't support them just because they're cheaper.  Theft is wrong.  Period. 

Let me know if you have any questions.  Always happy to help.  Happy Halloween!

For His glory and much love,
Jasmine

Thursday, August 31, 2017

Starry Sky for Scrapbooking with M.E. Boutique

 Hey guys!  Todays post is my final Guest DT project with Scrapbooking with M.E. Boutique.  This card is fairly simple.  We have some ink blending using colors from the second set of the Distress Oxides with a stencil and some BoBunny Glitter Paste over the top.  What I love about the glitter paste is that it picks up the color of whatever ink you put underneath it, so it looks almost as if it's lit from behind; such a cool effect.  To finish it off, I added a strip of gold on the left side to tie in the gold on the die-cut sentiment.  Simple, yet stunning.  This technique offers such a plethora of variations, so I encourage you to break out you inks and stencils to see what you come up with.
Here is the link to the video tutorial on my YouTube channel and my supply list is below.

Supplies:
Bristol Smooth cardstock
Distress Oxide Inks
Distress Ink
Hero Arts Sky Stencil
BoBunny Glitter Paste in Sugar
Avery Elle Wonky Stitches die
DCWV Gold Foil paper
Stick-It sheet adhesive
Neenah Classic Cream cardbase
Scor-tape 

Thanks for stopping by and hanging out with me today.  I'm always happy to answer any questions, so feel free to ask.  See you next time!

For His glory and much love,
Jasmine

Friday, August 25, 2017

From Backgrounds to Cards

 A few weeks ago, I posted a video on backgrounds using Distress Oxide re-inkers.  Todays post gives you some ideas for using those backgrounds in card projects.  For the top card, I really loved the rainbow effect and wanted it to be the focal point so I kept it simple with a sentiment and a few sequins.  For the bottom card, I used a stencil and some black glitter paste to add some impact while bringing the rainbow colors forward.  To finish it off, I added a die cut and heat embossed sentiment and mounted to a card base with some gold foil paper as a mat to tie in the gold in the die cut.

Here is the video on my YouTube channel demonstrating the background technique and my supply list is below.

Supplies:
Canson XL 140 lb watercolor paper
Distress Oxide Reinkers
  • Picked Raspberry
  • Wild Honey
  • Salty Ocean
  • Twisted Citron
  • Lucky Clover
Imagine Crafts Shimmer Spritz

Top card:
Stitched Rectangle die
Scor-tape
Funny Bones RWD 418 (sentiment)
Pretty Posh 4mm Sparkling Clear sequins
Little Things Ivory sequins

Bottom Card:
DCWV Gold Satin foil paper
Stitched Rectangle die
Concord & 9th Hello die
Wow Turkish Nights embossing powder
Hero Arts Swirl Stencil
Nuvo Black Diamond Glimmer paste

Monday, July 31, 2017

Zig Butterfly Flight with Scrapbooking with M.E. Boutique

 Hello!  Todays project is the first of three Design Team projects for Scrapbooking with M.E. Boutique and I'm so excited to be working with them.  I've stamped and masked my butterflies starting with the pink butterfly and ending with the yellow one, using Altenews Bejeweled stamp set.  I stamped the butterflies using Archival ink because it's waterproof and wont run or smear when any water based medium is applied.  Canson XL 140lb watercolor paper was the surface is chose to work on.  Zig Clean Color markers are a brush tipped water-based marker that you can use with water to create a lovely variety of watercolor effects, without having to go into actual watercolors and using them with watercolor paper gives perfect results because the paper is designed to accept a lot of water without pilling or warping.  You can use these markers with Bristol Smooth cardstock, but I don't suggest using much water with it.

Here is the link to the video tutorial on my YouTube channel.  Supplies are listed and linked below.

Supplies:
Canson XL 140lb watercolor paper
Altenew Bejeweled stamp set
Lawn Fawn Stitched Rectangle die
Masking paper or Post-It notes
Archival Jet Black ink
Zig Clean Color markers
Orange: 70, 50, 51, 52
Pink: 25, 26, 27, 28
Green: 33, 38, 42
Background: 31, 36
Spectrum Noir Clear Sparkle Pen
DCWV Shimmer stack
Matte Medium
Sequins
Versamark
Platinum Embossing powder
Scor-tape
If you are at all interested in watercolors, give these markers a try.  They are so vibrant, fun to use and you can create beautiful projects with ease.  Let me know if you have any questions; I'm always happy to help.  Thank you for stopping by.  I so appreciate every like, share and subscribe here on my blog and my YouTube channel; every one helps.

Saturday, July 15, 2017

Shaker Shake-up with Heat Resistant Acetate

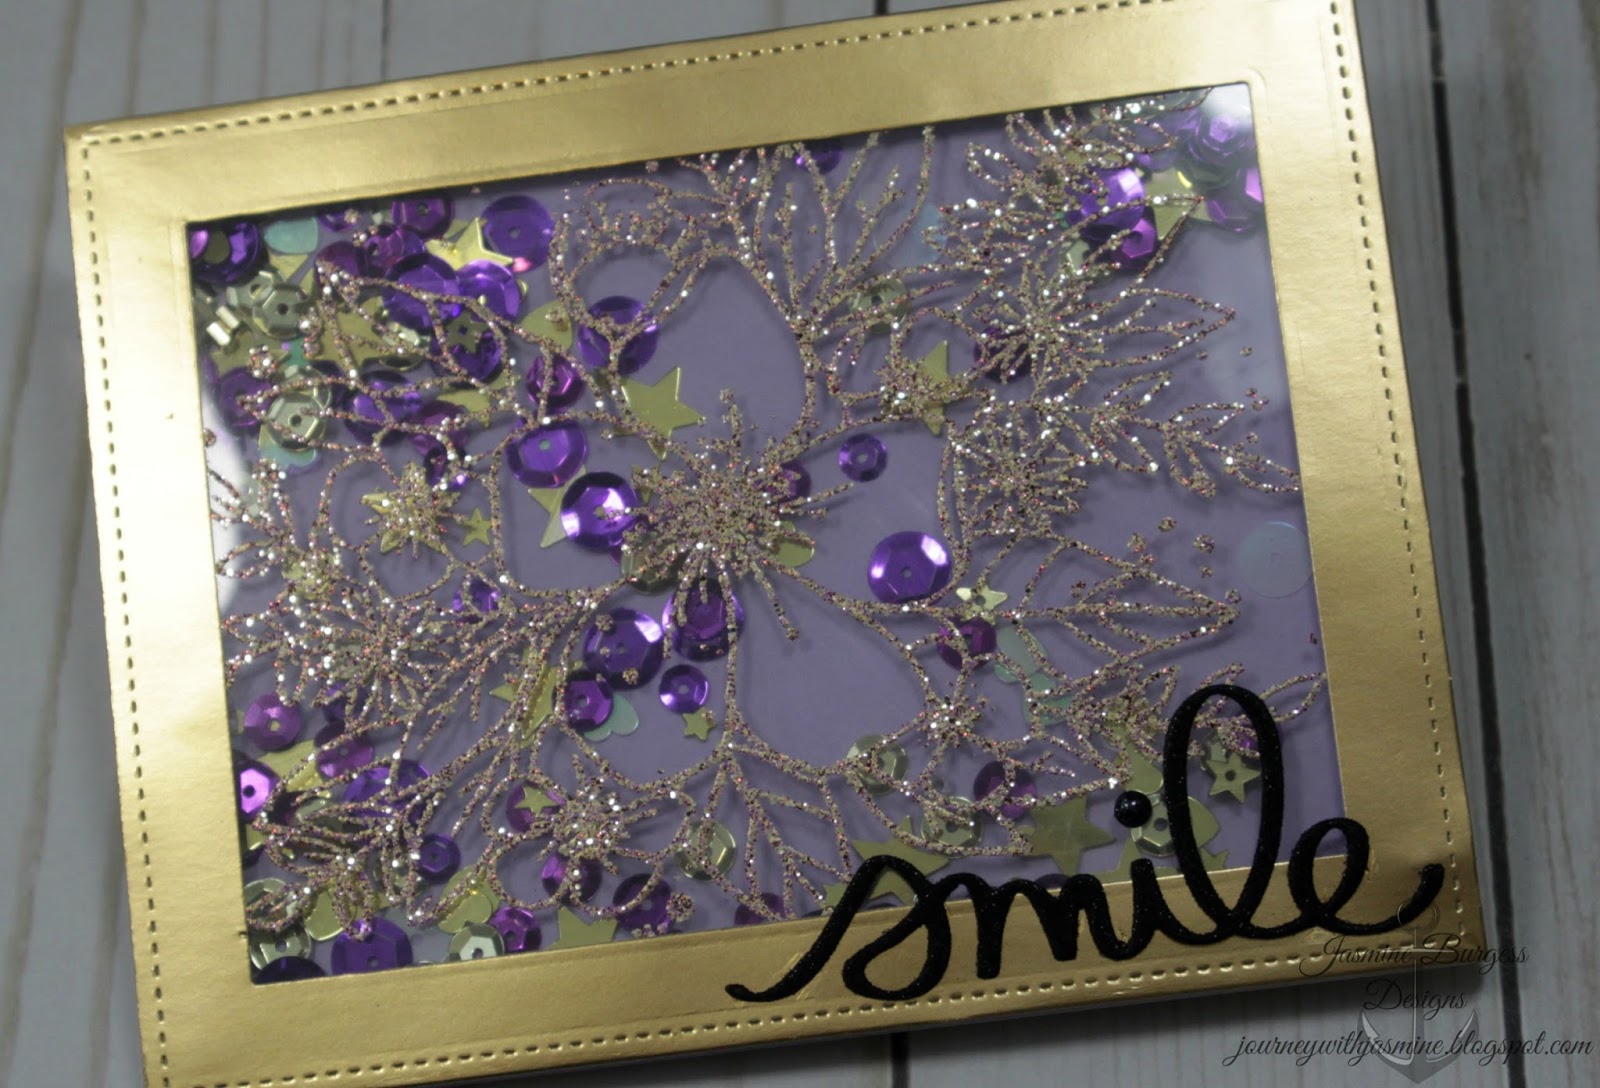
 Todays project is a bit of a spin on a Shaker card.  Instead of a die cut window with stamping on the surrounding panel, the stamped image is on the window, making the shaker window the true focal point.  I created this using Heat Resistant Acetate.  Because it's heat resistant, you can stamp and emboss on it without it shrinking, warping or twisting.  A powder tool is key when using the acetate with embossing powder because of how prone to static acetate is.  I rub my powder tool over the entire area I'm going to stamp and heat emboss to ensure that my image comes out clearly.  Here is the link to the video tutorial on my YouTube channel and my supply list is below.

Supplies:
Concord & 9th Hello Lovely stamp set
Lawn Fawn Stitched Rectangle dies
Versamark
Wow Turkish Nights embossing powder
Hot Off The Press Heat Resistant Acetate
3M Foam tape
Scor-tape
Little Things Sequin Mixes
  • Gold Dust
  • Pretty Pansy
Lavender cardstock
MISTI
DCWV Gold Foil paper
Smile die
Elizabeth Crafts Black Microfine Silk Glitter
Black cardstock
Stick-It
Black Glitter enamel dots

Thanks for stopping by!  See you next time!

For His glory and much love,
Jasmine

Monday, May 22, 2017

Text Hugs with Concord & 9th

 I've been on a roll with Concord & 9th products lately; I just can't help it.  I get so many ideas and it's hard to narrow it down sometimes.  That's not a bad thing though.  Hopefully, my ideas and designs will inspire your ideas and designs and we'll all be happier as a result.  The world needs more cuddles and hugs anyway.

This card started with having the hugs die cuts left over from other projects, whose videos are linked below if you're curious, and using gray helped to ground the card as well as help the teal and purple tones stand out.  The tone on tone gray text background served to soften the design as well as give it a coziness.  To create the frame, you can use any two rectangle dies; just make sure they're spaced evenly before you run it through your die cutting machine.  Here's the link to the video tutorial on my YouTube channel and my supply list is below.

Supplies:
Concord & 9th Cuddles and Hugs stamp and die sets
Simon Says Stamp Fog cardstock and ink
Neenah 110 lb Solar White cardstock (base)
Tombow Mono Multi glue
Little Things Sequin mixes
  • Pearl Necklace
  • Starshine
Matte Medium
DCWV Shimmer cardstock
My Favorite Things Wonky Stitches dies
Scor-tape

 Watercolor shaker video

Rainbow Hugs video

If you have any questions, please leave them in the comments and I'll be happy to help!  Thanks for stopping by and I'll see you next time!

Wednesday, April 12, 2017

Easter Triple Play

Todays post and video are done in a bit of a different style than usual.  I have 3 cards, all of an Easter theme celebrating the resurrection of our Lord Jesus, utilizing experiments.  When I get new products, I like to play with them and experiment so I have a bin in my studio with several random bits.  These cards were created using a few of those panels.  I chose to do it this way because Easter has devolved into chicks, bunnies, toys and candy.  I wanted to convey it's true purpose and true meaning and I hope you enjoy.
Oh Happy Day Supplies:
Nuvo Glimmer Paste
Tanzanite Lavender
Peridot Green
Neat & Tangled Scalloped stencil
Bristol Smooth cardstock
Simon Says Stamp Cross die
Simon Says Stamp Oh Happy Day die
DCWV Gold Foil cardstock
Stick-It Sheet Adhesive
Neenah 110 lb Solar White cardstock base
Scor-tape

Start with a Bristol Smooth panel cut to 4"x 5.25" and tape the stencil down on the corners.  Smooth the lavender Nuvo paste over the top half and the green over the bottom half, blending the two colors in the middle.  Remove stencil while paste is still wet.  Set aside the panel to dry and immediately wash the stencil and palette knife.  The panel will take an hour or so to dry completely, but I let mine sit for several hours.  Once dry, center the cross die in the middle of the panel so that the pattern is even in the die and run it through your die cutting machine.  Give it a few passes; you may have to use your craft knife to help complete the cuts in a few places.  Cut the gold cardstock to 4.25" x 5.5" and adhere to the card base using Scor-tape.  Center the glitter paste panel and center it over the gold.  Apply Stick-It to the back of some gold cardstock and run the Oh Happy Day die with the gold cardstock through the die cutting machine.  Remove the die cut from the rest and remove all the little bits and pieces.  Arrange the die cuts over the glitter panel, remove backing paper and press down.  I started with Day because it was at the bottom and wanted to make sure it didn't hang off the edge of the glitter panel.  The card is complete.

Loved You Supplies:
MISTI
Bristol Smooth cardstock
Nuvo Moonstone Glimmer Paste
Neat & Tangles Scalloped stencil
Lawn Fawn inks
  • Minty Fresh
  • Moonstone
  • Fresh Lavender 
  • Ballet Slippers
  • Peachy Keen
My Favorite Things Wonky Stitches dies
Penny Black Faith stamp set
Mama Elephant His Love stamp set
Wplus9 Oatmeal cardbase
Vellum
Stick-It sheet adhesive
Sizzix rectangle frame die
Versamark
Ranger Liquid Platinum embossing powder
Scor-tape

In order listed above, I used the ink blending technique to add color to my panel.  Next, I applied the glimmer paste using the stencil and let that dry.  Once the paste was dry, I ran in through my die cut machine with the largest of the MFT Wonky Stitches dies.  Using vellum with Stick-It on the back, I stamped and heat embossed my images followed by die cutting them.  To finish up, I adhered the colored panel to the cardbase with Scor-Tape and layered the vellum images on the front.  Card completed.

His Love Never Fails Supplies:
MISTI
Glossy cardstock
Alcohol Inks
  • Pearl
  • Flamingo
  • Patina
Alcohol Ink Blending Solution
My Favorite Things Wonky Stitches die
Mama Elephant His Love stamp set
Versamark
Ranger Liquid Platinum embossing powder
Die cut Cross from the first card
Ellen Hutson Natural White cardbase
Scor-tape
3M Foam tape
Here is the link to a previous video demonstrating the alcohol ink technique on my YouTube channel so you can see how I created the background. 

Here is the link to the video tutorial with these three cards on my YouTube channel.  It was a joy creating these cards to share my faith and I sincerely hope you can share in the joy and promise of Easter as well. 

To His glory and much love,
Jasmine

Handmade Christmas Series 2018: Day 1 Watercolors and EH Mondo Holly 2 ways

Here's an exciting sale for everyone!  ellenhutson.com is having a 20% off sale on all dies with the code above.  I...