Showing posts with label WOW. Show all posts

Wednesday, July 25, 2018

Soft Encouragement Card with Ink Blending and a Stencil

 Hello!!  I know it's been a minute since I've posted a project or video.  Sometimes life gets in the way of art and you have to prioritize.  My husband is in Stage 5 Kidney Failure and is on the transplant list.  As you can imagine, that has taken all of my focus over the past several weeks and I've needed to get back to my studio to restore myself a bit.  Todays project was inspired by two elements in my life; my faith in Jesus and my friends and family that have rallied around my husband and I to support us.  God is amazing. 

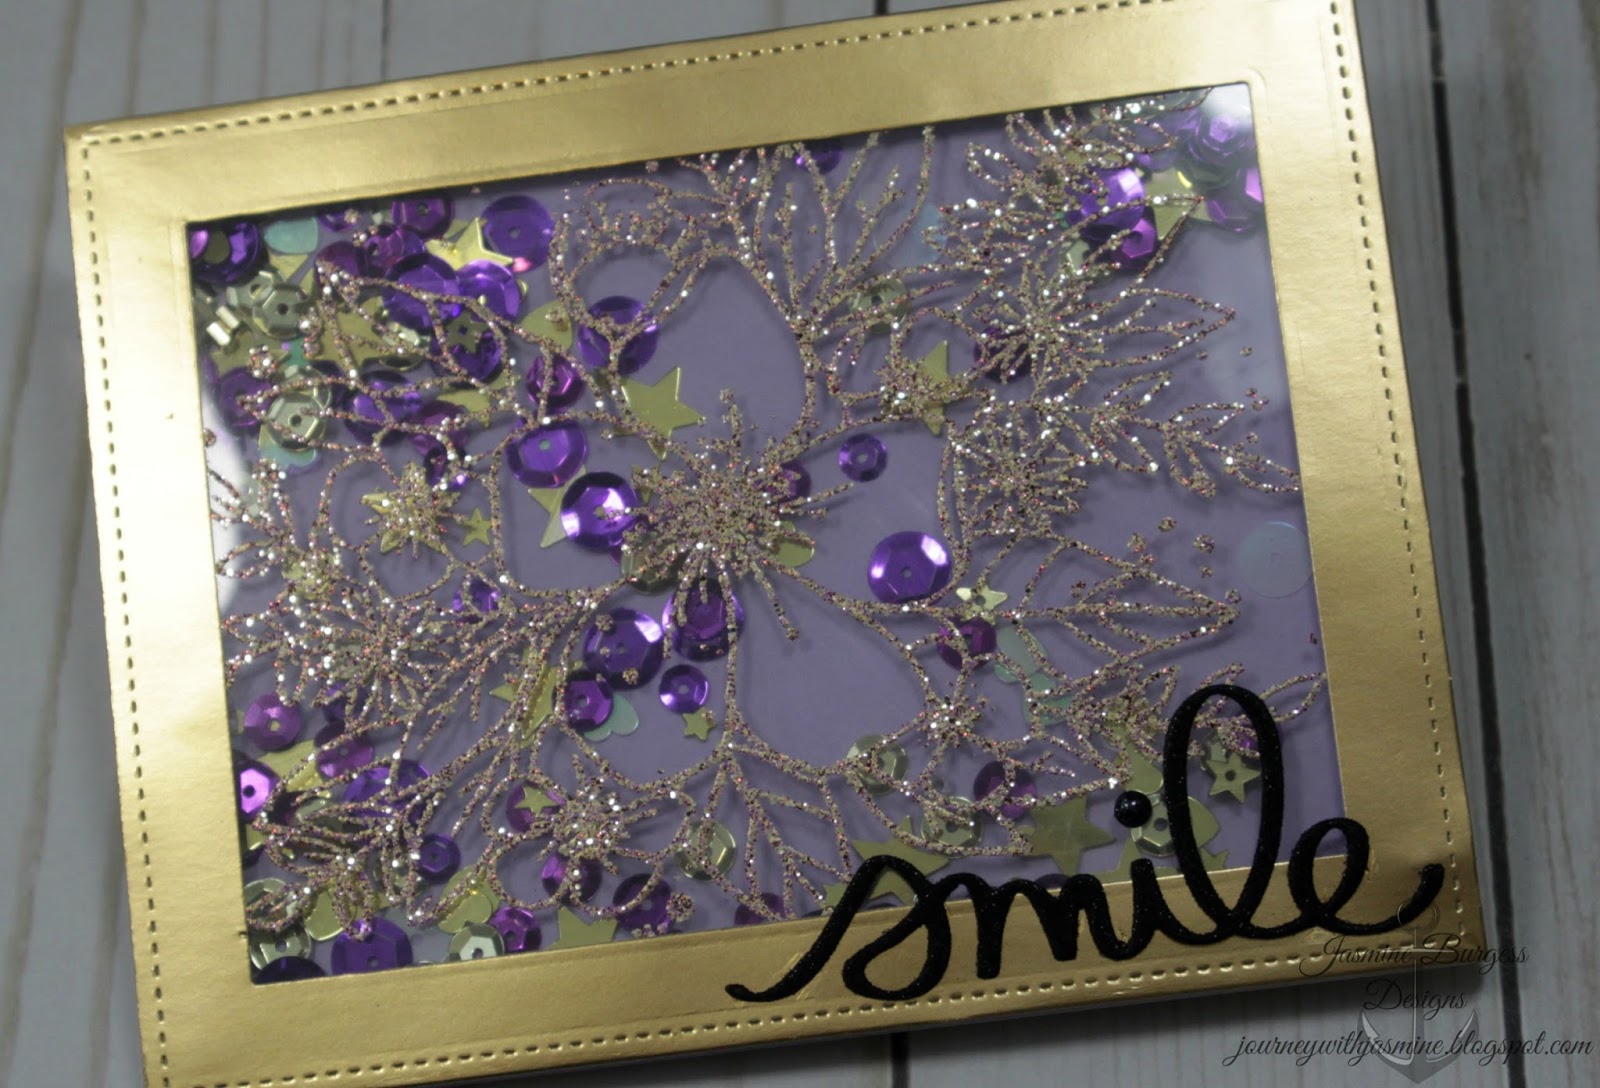
The sentiment stamp is from The Ink Road and it's a favorite expression of mine.  I love the size and different fonts Lara used in it's design.  I started by stamping it in the middle of my panel and heat embossing with Rose Gold embossing powder.  Next, I used the Radiating Star stencil by Neat and Tangled off center to the upper left of the sentiment with a pale blue ink by Catherine Pooler Designs.  Side note: if you haven't tried Catherines inks, you are missing out.  They are fantastic and rival any ink I've ever used (including Distress).  I followed the stenciling with a brighter toned blue ink around the edges, keeping it soft.  It still needed something so I looked through all my floral stamps and decided on the Mondo Sakura, which is a Cherry Blossom, by Ellen Hutson and stamped that twice using a medium lilac shade.  To tie everything together and add a bit of shine, I finished it off with some flat-back pearls in Thistle by Little Things.  Those pearls are teeny-tiny and so pretty, so they add just a bit of flair without going overboard.  Perfection.

Here is the link to my Youtube channel where I have the video tutorial if you're interested in watching.  Below is my supply list with links if you're interested in getting any of the products I use and love.

Supplies:
https://www.ellenhutson.com/wow-embossing-powder-regular-rose-gold/#_a_186Neenah Solar White Classic Crest
Ink Road Stamps: Chin Up Buttercup
Wow Rose Gold embossing powder
Versamark
MISTI
Neat and Tangled Radiating Star stencil
Catherine Pooler Designs inks: It's a Boy, Something Borrowed and Sweet Sixteen
Ellen Hutson Mondo Sakura stamp
Little Things Pearls: Glossy Thistle Mix


Thanks so much for stopping by!  It's good to get back into my studio and creating again!  Be sure to let know what you think here or over on my YouTube channel.  It's so much fun getting to interact with you! 


Saturday, January 27, 2018

Gerda Steiner Designs DT Valentine Penguins with Copics and Distress Oxides

 Todays project is the another card I created as a guest designer for Gerda Steiner Designs.  My idea for this one was penguins on the tundra with happy greetings and the penguin holding the balloon fit in perfectly.  The bottom snow panel can be created two ways.  The first is by using white glitter cardstock cut to size freehand or with a die, which is what I did.  The second is to cover piece of white cardstock with Versamark and heat emboss using white glitter embossing powder.  If you're not into glitter, you could just use white cardstock.  The background was made with 3 shades of blue Distress Oxide inks.  If you aren't familiar with them, they are a hybrid of dye and pigment inks, giving them super easy blending and there are several fun techniques you can do with them (but that's another post).  The penguins were stamped in Memento Tuxedo Black ink and colored with Copic markers, then fussy cut.  I don't have the dies yet and these are fairly simple shapes to cut out.  The penguin with the balloon is one image, but I just cut them apart to avoid trying to cut out the string.  Instead, I fussy cut the balloon and penguin and stamped a swirly dash line from another stamp set in my stash for the balloon string.  That allowed me to have more flexibility with placing the penguin and balloon as well as the ability to add dimension by popping it up with foam squares.  I have a video tutorial on my YouTube channel if you'd like to see how this project came together from start to finish and my supplies are listed and linked below.

Supplies:
Bristol Smooth cardstock
Gerda Steiner Designs Valentine Penguins
MISTI
White Glitter cardstock
Simon Says Stamp Stitched Slopes die
Distress Oxide inks:
  • Broken China
  • Salty Ocean
  • Faded Jeans
Copic Markers:
C6, 8, 9/ Y17/ YR15/ V04
Avery Elle Wonky Stitches die
Memento Tuxedo Black ink
Spectrum Noir sparkle pen
Versamark
Wow Sparkling Snow embossing powder
Plum cardstock
Foam squares
Scor-tape

Thank you to Gerda Steiner Designs for having me!  I look forward to doing it again sometime.  And thanks to my audience for stopping by.  Always happy to help with questions if you have any and please let me know how you like todays card.  See you next time!

For Christs Glory and much love,
Jasmine

Wednesday, December 6, 2017

Handmade Christmas 2017: Alcohol Inks and Chibitronics

 Merry Christmas and welcome to the final card of the Handmade Christmas 2017 series.  This design came about through the idea "what if there was a snowman at the manger when Jesus was born?"  Snowpeople are always such happy creatures and I imagined they would celebrate that first Christmas too.  I made several alcohol ink backgrounds and the wavy stripes made me think of a cold, winter night, just right for a snowman and the rest followed suit.  I die cut a small star in the upper right corner, added the stamps and heat embossed them and the front panel was almost complete.  Then I built the circuit for the lighted star and put everything together with some sequins to finish it off.  When you press on "Star" in the sentiment, the little star lights up.  Delightful!  This design is suitable for everyone on your list too.  From single dudes to grandparents or colleagues, done.  Here is the link to the video tutorial on my YouTube channel and my supply list is below. 

Supplies:
Penny Black Rejoice with Joy stamp set
My Favorite Things Holiday Hugs stamp set
Ranger Glossy cardstock
Ranger Alcohol Inks:
  • Denim
  • Indigo
  • Snow
  • Sky
Versamark
Wow Vintage Champagne embossing powder
Lawn Fawn Puffy Star die
Vellum
Chibitronics
3M Foam Tape
Scor-Tape/ Be Creative tape
Ranger Matte Medium
Pretty Pink Post 4mm Sparkling Clear sequins
Little Things Lily White sequin mix

Thanks for stopping by!  I hope you have a wonderfully joyous Christmas and get the opportunity to worship often.  The story of Jesus' birth can be found in Luke 2: 6-16 if you're wondering.

Merry CHRISTmas!
Jasmine

Friday, November 10, 2017

Handmade Christmas 2017: Neat & Tangled Lumberjack Love with Copics

 Hello and welcome to the second card in my Handmade Christmas 2017 card series.  The Neat & Tangled Lumberjack Love set is geared more towards Valentines day than Christmas, but I thought why couldn't it be a Christmas card.  Romance abounds around the holidays, possibly even more so that the rest of the year.  So this card is for lovers and I colored the girl like me and the boy like my husband.  He proposed to me in January and we're coming up on our 10 year wedding anniversary, so he was on my mind while making this card.
I stamped the images first, using the MISTI and Memento Tuxedo Black ink.  When deciding which ink to use, keep this rule in mind: opposites attract.  Copics are alcohol ink markers and need dye ink images because the dye ink doesn't react with alcohol and it wont smudge or bleed.  The industry has made advancements in technology and produced inks that are any medium safe, but I don't have them, so I'll continue to use what I know ;).  The background is alcohol inks and Yupo.  Yupo is actually plastic and will warp easily with heat.  The piece I used did begin to warp as I finished up the embossing.  So be careful with it.  Let your gun run for 30-60 seconds to get hot before applying to your paper so that you're heating for a shorter time span.  Or just use glossy cardstock with your alcohol inks and avoid the issue altogether.  Here is the link to the video tutorial on my YouTube channel and the supplies are listed below.

Supplies:
Neat & Tangled Lumberjack Love S&D
Bristol Smooth cardstock
Memento Tuxedo Black ink
MISTI original
Wow Snow Sparkle embossing powder
Versamark
Ranger Silver Pearl embossing powder
Avery Elle Wonky Stitches die
White Yupo paper
Ranger Alcohol inks
  • Denim/ Sky/ Indigo/ Amethyst/ Snow Cap/ Pearl
Alcohol Blending Solution
Mini Mister
Woodgrain patterned paper
Scor-tape
Foam Squares
Copic Markers
Brown Hair: E25, 27, 29, 71, 74
Blonde Hair: E51, 33; YR20
Girl Outfit: E13, 15, 17, 19, 50, 51 Headband and Bird: B12, 14, 16
Boy Outfit: Hat and Shirt: B12, 14, 16 Jeans: B32, 34 Shoes: E13, 15, 23, 25
Skin: E51, 33, 31 Ax: C2, 4
Stump: E31, 27, 47, 49

Thanks for stopping by.  Always happy to answer any questions.  Merry Christmas!

For His glory and much love,
Jasmine

Thursday, August 31, 2017

Beach Day Slider

I'm squeezing this fun and sunny slider card in at the tail end of summer because I can!  And to be honest, this summer went by so stinking fast, so lets get started.  We have Copic coloring, ink blending, heat embossing and a slider feature.  If you're new to card-making, a project like this can seem daunting and complicated.  However, like most things, when you break it down into individual steps, it's simple and straight forward.  The sand, wave and sky are simple ink blending.  The sand and wave are die cut.  The wave is heat embossed with glossy clear embossing powder.  The critters, sun and castle are stamped, colored and die cut.  I stamped two of the hippo with the second to color and fussy cut just the watermelon and hand section to pop it up on the finished card.  Now we have all of our components. 
Die cut the slider channel from the wave piece and build the support on the back with foam tape.  Lay the wave and sand over the sky so that the wave peeks up behind the sand while the slider channel remains hidden.   Attach slider discs to the back of the elephants feet and place him in the slider channel.  Insert the elephant and move him back and forth to see how he looks and if you like the placement.  Stamp and heat emboss the sentiment at the top left corner of the sky.  Add foam tape to the back of the sand so that it doesn't interfere with the slider mechanism.  Adhere each critter, sun and castle and the card is complete. 
Here is the link to the video tutorial on my YouTube channel and my supplies are listed below. 
Supplies:
Neat and Tangled Beach Day S&D sets
Bristol Smooth cardstock
MISTI
Wplus9 Wave Border die
My Favorite Things Spin and Slide discs
My Favorite Things Surf and Turf die
Versamark
Wow Sparkling Snow embossing powder
Brutus Monroe Icicle embossing powder
Distress Oxide inks
  • Broken China
  • Salty Ocean
  • Peacock Feathers
  • Antique Linen
  • Frayed Burlap
Spectrum Noir Sparkle Pen
Copic Markers
  • Elephant: W0, 3; R11; B32  
  • Ball: Y18, YR04, YG06, BG05, V05
  • Floaty: Y13, 18; YR04; B32
  • Hippo: C2, 4; R11; R32, RV13, G17, 05
  • Rhino: W0, 3; R11; BG05, B05, B000
  • Sun:  Y11, 13, 17
3M Foam Tape
Foam Squares
Neenah Classic Cream cardbase

Thanks for hanging out with me and I hope you try this one out.  It's so much fun for any age or gender.

For His glory and much love,
Jasmine


Friday, August 25, 2017

From Backgrounds to Cards

 A few weeks ago, I posted a video on backgrounds using Distress Oxide re-inkers.  Todays post gives you some ideas for using those backgrounds in card projects.  For the top card, I really loved the rainbow effect and wanted it to be the focal point so I kept it simple with a sentiment and a few sequins.  For the bottom card, I used a stencil and some black glitter paste to add some impact while bringing the rainbow colors forward.  To finish it off, I added a die cut and heat embossed sentiment and mounted to a card base with some gold foil paper as a mat to tie in the gold in the die cut.

Here is the video on my YouTube channel demonstrating the background technique and my supply list is below.

Supplies:
Canson XL 140 lb watercolor paper
Distress Oxide Reinkers
  • Picked Raspberry
  • Wild Honey
  • Salty Ocean
  • Twisted Citron
  • Lucky Clover
Imagine Crafts Shimmer Spritz

Top card:
Stitched Rectangle die
Scor-tape
Funny Bones RWD 418 (sentiment)
Pretty Posh 4mm Sparkling Clear sequins
Little Things Ivory sequins

Bottom Card:
DCWV Gold Satin foil paper
Stitched Rectangle die
Concord & 9th Hello die
Wow Turkish Nights embossing powder
Hero Arts Swirl Stencil
Nuvo Black Diamond Glimmer paste

Saturday, July 15, 2017

Shaker Shake-up with Heat Resistant Acetate

 Todays project is a bit of a spin on a Shaker card.  Instead of a die cut window with stamping on the surrounding panel, the stamped image is on the window, making the shaker window the true focal point.  I created this using Heat Resistant Acetate.  Because it's heat resistant, you can stamp and emboss on it without it shrinking, warping or twisting.  A powder tool is key when using the acetate with embossing powder because of how prone to static acetate is.  I rub my powder tool over the entire area I'm going to stamp and heat emboss to ensure that my image comes out clearly.  Here is the link to the video tutorial on my YouTube channel and my supply list is below.

Supplies:
Concord & 9th Hello Lovely stamp set
Lawn Fawn Stitched Rectangle dies
Versamark
Wow Turkish Nights embossing powder
Hot Off The Press Heat Resistant Acetate
3M Foam tape
Scor-tape
Little Things Sequin Mixes
  • Gold Dust
  • Pretty Pansy
Lavender cardstock
MISTI
DCWV Gold Foil paper
Smile die
Elizabeth Crafts Black Microfine Silk Glitter
Black cardstock
Stick-It
Black Glitter enamel dots

Thanks for stopping by!  See you next time!

For His glory and much love,
Jasmine

Tuesday, June 20, 2017

Trust His Word featuring Concord & 9th

 I was so excited and appreciative the first time I saw the Faith and Love set by Concord & 9th.  While more and more companies are producing more faith based sets now, it's been a long time coming.  With Bible Journaling rising in trend, it's having a ripple effect into cardmaking and I love it.  As I sit, writing this post and watching the myriad of colorful birds at my birdfeeder, I am again reminded of how creative God is.   I like to talk to God while I drive and often look up at the sky, so that was the initial inspiration for the design.   He is the center or focus of this card so I used "His" as the center stamp and placed the other words around it until I liked the composition.

The design for this card is simple; a few stenciled clouds and heat embossing with glitter embossing powder.  Keeping the background light and simple allows for the glitter powder to stand out and catch attention.  Any time you want to use a glitter embossing powder, I suggest you do that as your last step.  Anything you do over or on top of the glitter powder (obviously after it's been heat set) will end up removing some of your glitter.   Here is the link to the video on my YouTube channel and my supply list is below.

Supplies:
Strathmore Bristol Smooth cardstock
My Favorite Things Wonky Stitches die
Concord & 9th Faith and Love stamp set
MISTI
Versamark
Wow Golden Flame embossing powder
Lawn Fawn Moonstone ink
Inky Antics Cloud stencil
Hero Arts Soft Sky ink
Turquoise cardstock
Little Things Nautical Sparkle sequin mix
Pretty Pink Posh 4mm Sparkling Clear sequins
Ranger Matte Medium

Thanks for stopping by! See you next time.

For His glory and much love,
Jasmine

Wednesday, June 14, 2017

Peekabo Mandala Birthday with Concord & 9th

 Todays project has a die cut window with heat embossing allowing a view to the inside.  The Many Mandala stamp set has four mandalas that are designed to fit together so that it creates a beautiful design.  To do heat embossing on acetate, you must use Heat Resistant acetate as any other acetate will melt and warp if heat is applied.  Here is the link to the video tutorial on my YouTube channel and my supply list is below.

Supplies:
Turquoise card base 4.25x11, folded in half
Concord & 9th Many Mandala stamp and die sets
Hot Off The Press Heat Resistant Acetate
Versamark
MISTI
Ranger Silver Pearl embossing powder
WOW Mermaid Tails embossing powder
Simon Says Stamp Island Blue ink
Lawn Fawn Deep Sea ink
Little Things Sequins
  • Nautical Sparkle 
  • Peacock
Scor-tape
Ranger Matte Medium

Thanks for stopping by!  See you next time.

Much love and for His glory,
Jasmine

Wednesday, May 10, 2017

Ink Blended Rainbow Hugs with Distress and Concord & 9th

 Hello!  As you know, I love bright colors; they make you happy.  Ink blending being one of my favorite techniques; it's one I use often and I love experimenting with new color combos to see what I can create.  Emboss resist, ink blending and die cuts are all employed to create this bright, happy, punchy card. 

If you have trouble with ink blending, I have a few tips for you.  The first is to change your cardstock.  I used Neenah 110 lb Solar White for years and I got good results, but it took some work.  I heard some good things about Strathmore Bristol Smooth and once I tried it, I never looked back.  Bristol Smooth is a bit heavier and smoother than Neenah, but Neenah isn't a bad cardstock.  I still use it for sturdy cardbases.  The second tip is to hold your blending tool at an angle so that the entire surface of the tool is not in contact with the cardstock.  Use circular motions and little pressure; more pressure creates more friction making is harder to move the tool around. 

Here is the link to the video tutorial on my YouTube channel where I demonstrate how to create this project from start to finish.  My supply list is below.

Supplies:
Concord & 9th Cuddles and Hugs stamp and dies
Bristol Smooth cardstock
Neenah Solar White 110 lb (cardbase)
MISTI
Distress Inks (original)
  • Mermaid Lagoon
  • Squeezed Lemonade
  • Abandoned Coral
  • Wilted Violet
Imagine Crafts Shimmer Spritz
My Favorite Things Wonky Stitches die
Versamark
Wow White embossing powder
Scor-tape
Matte Medium

Thanks for joining me today!  Leave any questions in the comments and I'll be happy to help.  See you next time!

In His glory and much love,
Jasmine

Thursday, May 4, 2017

Soft and Loose Watercolor Mother's Day Hugs Shaker with Concord & 9th

 We are almost half way through the year already and while I'm wondering where the time has gone, Mother's Day has quietly crept up.  I have three Mother's Day cards to make every year and I enjoy the creative challenge of doing something different.  Traditionally, flowers make an appearance and while my Mom and both MIL's enjoy flowers, I went a another direction.  This design is really versatile, perfect for birthday, thinking of you, encouragement and sympathy.  Starting with white embossing on watercolor paper, I used powdered watercolor paints to create a loose and soft emboss-resist background.  After that was dry, I die cut the "hugs" and the border edge detail.  To finish it up, I stamped an accompanying sentiment in the bottom right corner, built the shaker and mounted it to a card-base. 
Here is the link to the video tutorial on my YouTube channel and my supplies are list below.  If the idea of Watercolor is intimidating, try the loose technique demonstrated in my video.  It's really easy and so user-friendly, not to mention hard to mess up.

Supplies:
140 lb Watercolor paper
Concord & 9th Cuddles and Hugs stamp and die sets
Versamark
White embossing powder
MISTI
Lindy's Stamp Gang Magicals shakers
  • Guten Tag Teal
  • Polka Purple
Colorburst Liquid Metals Platinum
Colorburst Orchid
My Favorite Things Wonky Stitches
Hero Arts Acetate
Scor-tape
Tombow Mono Multi glue
3M Foam Tape
Little Things Sequin Mixes
  • Pacific
  • Lucky Dip Purple Paradise
Memento Tuxedo Black ink
SSS Smoke cardstock

Monday, January 30, 2017

Easy Watercolor Floral

 Hey there!  Todays project is an easy and versatile watercolor card using Zig Clean Color markers and a sparkle pen or paintbrush.  My color scheme for this card is one I don't use often.  I wanted to challenge myself to use the red/orange/yellow color family more often in the coming year and started with this one.  Another challenge I gave myself was to use more of my studio supplies, rather than continuously going back to old favorites and my comfort zones.  I've had the Zig markers for quite some time, but wasn't a huge fan of them.  Now that I've done a few cards with them, they are really fun and easy to use.  On this card, I employed a paintbrush to give me both soft and hard edges as well as a bit of dry-brushing on the yellow flower.  Dry-brushing is using your brush just slightly damp; you want enough water to allow your color to move, but just a little so that the brush marks show.  On the large petal on the top flower you can see some of the texture of the brushstroke. 
Below is the color palette I chose as a starting point.  I have a whole board on Pinterest of palettes that I look through when I can't decide what color combo to go with. 

Seashore
Here is the link to the tutorial on my YouTube channel if you want to see how I created this project from start to finish.  My supply list is below.

 Supplies
Avery Elle Wonky Stitches die
Strathmore 140 lb watercolor paper
Versamark ink
MISTI
Ranger Turquoise embossing powder
Zig Clean Color brush markers: 70, 51, 47, 31
Concord & 9th You Are Enough
The Greeting Farm God is Awesome
Wow Metallic Copper SF embossing powder
Lawn Fawn Stitched Rectangle die
Pale Yellow Pearl cardstock
Neenah Solar White 110 lb cardstock
Scor-tape

 
Thanks for stopping by!  I hope you are encouraged to get outside of your comfort zone and try something new.  Catch you next time!


Much love,
Jasmine

Saturday, January 21, 2017

You Are Enough with Concord & 9th

 .:


Hello!  I've decided to start todays post with the color palette that I started my card with.  With this palette in mind, the card began to emerge...
Starting with colors in the blue-green/teal arena, I stamped the flowers.  The stamp set I chose is one that you have the option to layer or not.  I stamped the line images and followed up with the layering pieces.  Blending the brown tones around the edges highlights the embossed pattern from the die as well as creates contrast between the colors.  Adding the Bronze embossing powder to the sentiment provides a textural contrast as well as sophistication.  To finish off the front panel, I added sparkle to the flowers using a glitter brush pen.  To keep it light, I didn't bring the brown tones in to far.  I wanted to take advantage of the white space.  Using the same colors in the flowers, I ink blended around the edges of the card base to tie everything together and complete the card.  I'll be honest, I did think about adding sequins, but liked the simplicity of it without them.
 Here is the video tutorial on my YouTube channel if you'd like to see how I created this project from start to finish.  My supply list is below.

Supplies:
Concord & 9th You Are Enough
Memento Tuxedo Black ink
Neenah Solar White 110 lb cardstock
MISTI
SSS inks: High Dive, Spring Rain, Scuba, Blue Jay
Avery Elle Wonky Stitches die
Wow Metallic Copper embossing powder
VersaMark embossing ink
Distress Inks: Brush Corduroy and Ground Espresso
Scor-tape
Spectrum Noir Clear Sparkle Pen

Thanks so much for stopping by!  Let me know if you have any questions, what you think and what you'd like to see next.  See you next time!

Much love,
Jasmine


Monday, December 19, 2016

Handmade Christmas Series 2016: Card 10 Sparkling Snowflakes

Hello!  Today's card is the final card of my Handmade Christmas Series 2016.  I love this card because it's so lovely and suitable for any winter holiday or occasion.  I used an alcohol ink panel to stamp and die-cut my snowflakes. I have a video on my YouTube channel demonstrating how to do alcohol ink panels if you're interested in learning more about them linked here.  I used My Favorite Things Snowflake Sparkle card kit to create this and several other cards as well.  I used two stitched rectangle dies to die-cut the frame from silver glitter paper.  After heat embossing the sentiment and snow, I ink blended light blue over the heat embossing utilizing the emboss-resist technique.  I stamped, heat embossed and die-cut the snowflakes and finished the card by putting it all together.  Here is the video tutorial on my YouTube channel; I do apologize as it isn't quite as complete as my normal videos.  I had some footage gremlins steal some footage, but there was enough to demonstrate the important components.  My supply list is below.

Supplies:
MFT Snowflake Sparkle Card kit (stamps, dies, blue ink)
Neenah Solar White 110 lb cardstock
Alcohol ink panel
Versamark
Wow Sparkling Snow embossing powder
DCWV Silver glitter paper
Lawn Fawn Stitched Rectangle dies
Foam squares
MISTI
Scor-tape


This card was created using the same MFT card kit; Snowflake stamps and dies and sentiment dies.  I also used another alcohol ink panel.  After stamping, heat embossing and die-cutting the snowflakes in a diagonal direction down the middle of the panel, I used my paper trimmer to make a diagonal cut down the middle of the panel.  I used an embossing folder to create the sheet music background and ink blended Delicata Golden Glitz pigment ink over the sheet music panel.  After attaching the sheet music panel to the card base with scor-tape, I adhered the bottom half of the alcohol ink panel and fit the die-cut snowflakes back into the the panel creating an in-laid die-cut look.  I adhered the sentiment with Tombow Mono-Multi liquid glue and the card was complete.

Thank you so much for joining me today and I hope you and yours a safe, happy, joyous Christmas and New Year.  See you in 2017!

Much love,
Jasmine


Friday, December 9, 2016

Engraved Embossed Snowflake Ornament Tag with Infinity Engraving LLC

 Hello and Merry Christmas!  Todays project is a fun, easy and versatile tag that can be as elaborate or as simple as you want it to be.  It's also completely customize-able!  Change up the colors and stamps and you'd have something totally different.  So have fun experimenting and trying things out. 

I started with a Manilla tag and did some ink dipping, drying thoroughly between each layer.  If there is any moisture left in the tag, the stamping will blur out and you will lose the crisp edges. After that, I added the sheet music stamp in random spots and let that dry.  If the sheet music isn't dry, the white embossing powder will stick to it and you'll lose the intricacy of the snowflake stamp.  Then, I heat embossed the snowflake swirls using white pigment ink and glittery white embossing powder.  After that was heat set, I added more blue around the edges with an ink blending tool. 

Next is the die cut chipboard snowflake.  Cover the die cut with embossing ink and cover with embossing powder.  Tap off the excess and heat set.  Repeat this process, adding another layer of embossing powder.  Using the same sheet music stamp we used earlier, ink it up with embossing ink and have it standing by.  Add another layer of embossing powder and as soon as it's completely melted, stamp the sheet music stamp into it and lift off.  Add the die cut snowflake and die cut sentiment to the tag using liquid glue and the tag is complete.  Here is the link to the video tutorial on my YouTube channel if you'd like to see the process from start to finish and my supply list is below.


Supplies:
Ranger Manilla tag
Distress Inks: Blueprint Sketch, Brushed Corduroy and Evergreen Bough
Tim Holtz Holiday Wished stamp set
Simon Says Stamp White pigment ink
Wow Sparkling Snow embossing powder
Ranger Embossing Ink dauber/ Versamark
Inkadinkadoo stamp #98249 (snowflake swirl)
Infinity Engraving Chipboard Snowflake
Ranger Liquid Platinum embossing powder
My Favorite Things Merry Christmas die
DCWV Silver Glitter paper

What can you do with these?  I make one for each of my nieces and nephews and give them with their gifts as ornaments they can hang up on the tree for years to come. You don't have to limit these to Christmas; you can make them for birthdays or any significant occasion in someones life. 

Thanks for stopping by!  I'd love to know what you think or if you have any questions.  See you next time!

Merry Christmas and much love,
Jasmine

Friday, December 2, 2016

Winter Cabin Ink Dipped Christmas Tag with Infinity Engraving LLC

Hey y'all!  Todays project is a Christmas Tag featuring chipboard snowflakes from Infinity Engraving LLC.  I make a variety of these tags every year and give them as gifts to use as Christmas ornaments.  I try to personalize them, especially for the kids, and you can make them as elaborate or as simple as you want.  I start these with an ink dipping technique and heat dry them.  Expect it to curl up as you heat dry it; it will flatten back out as it dries.  If it's still cool to the touch, it's not dry yet.  Having the tag completely dry is important before moving on to the next step.  If you stamp on cardstock that isn't quite dry, the image can blur out and lose the crisp edges.  After stamping the cabin, I stamped and heat embossed my sentiment.  If the tag was still wet or had any moisture anywhere, the embossing powder would stick where we didn't want it and that can ruin the project.  Here is the link to the video tutorial on my YouTube channel if you want to see how to make this project and learn the techniques I used.  My supply list is below.

Supplies:
Ranger Manilla tags
Distress Inks: Blueprint Sketch, Brushed Corduroy, Evergreen Bough
Artistic Outpost: Midwinter stamp set or
Altenew Winter Cottage
Memento Tuxedo Black
MISTI
Versamark
Ranger Liquid Platinum embossing powder
Penny Black Rejoice with Joy stamp set
Wow Sparkling Snow embossing powder
Infinity Engraving Chipboard Snowflakes
Judikins Sticky Stuff embossing powder
Glitter Ritz Mystique glitter
Tombow Mono Multi Liquid glue

I hope you try out these techniques and have fun creating!  Check out Infinity Engraving LLC for tons of chipboard, wood shapes, and ornaments, perfect for creating personalized gifts.  Thanks for stopping by to visit.  Don't forget to subscribe so you never miss out.

Merry Christmas and much love,
Jasmine

Wednesday, November 23, 2016

Handmade Christmas Series: Card 4 Alcohol Ink Background

Todays card is an easy card that lends itself towards Christmas, but is also prefect for Hanukkah.  My background was created using Alcohol Inks on Glossy cardstock.  I used Copper embossing powder with the sentiment to create gorgeous contrast with the blues in the background.  Using a panel of fun foam cut slightly smaller than the blue panel, I popped it up against the glitter paper panel to give it dimension.  Here is the link to the video tutorial on my YouTube channel if you want to see how I created this card from start to finish.  My supply list is below.

Supplies:
Casual Fridays Star of David stamp set
Penny Black Rejoice with Joy stamp set
Lawn Fawn Stitched Rectangle dies
Versamark
WOW Metallic Copper Superfine Embossing Powder
Ranger Holographic Embossing Powder
Black Fun Foam
DCWV Glitzy Glitter Stack
Scor-tape
Neenah Solar White 110lb cardbase
Ranger Alcohol Inks and Blending Solution
Ranger Glossy cardstock

 I love everything about this card.  Not only is it beautiful, but it also places the emphasis of the season on the birth of Christ, where it belongs.  It's also simple and easy to put together and would be perfect for mass producing: you could skip the fun foam to make production even simpler.  Thanks for stopping by to hang out!  I hope you got some ideas and have a blast making your Christmas cards!

Merry Christmas and much love,
Jasmine


Tuesday, November 15, 2016

Handmade Christmas Series: Card 3 featuring SOA Collection

Merry Christmas!  I wanted to play with the traditional color palette and shake things up a bit, so I added lime and teal to the traditional red, green and gold.  Immediately after stamping the striped background, I applied some clear sparkle embossing powder and heat set that to add a beautiful shimmer.  After stamping and heat embossing the candies, I die cut them using the coordinating dies.  To create the vellum panel, I added Stick-It sheet adhesive to the back of the vellum, then die cut it using the Casual Fridays label dies in the SOA kit.  To stamp the sentiment and holly, I employed my MISTI to get things perfectly aligned.  It also allows for the need to repeat any stamping and it has become one of my most used items in my studio.  Here is the video tutorial on my YouTube channel if you'd like to see how I created this card from start to finish and my supply list is below.

Supplies:
2016 Stamp Of Approval Collection (* items are in the SOA box)
*Peppermint Stick background by Catherine Pooler Designs
*Candy Cane Lane Stamp and die sets by Catherine Pooler Designs
*Merry Labels die by Casual Fridays
*Merry and Bright stamp set by Catherine Pooler Designs
Simon Says Stamp inks in Lucky, Jellybean, High Dive, Lipstick Red and Dark Chocolate
Versamark
Neenah Solar White 110 lb cardstock
Lindy's Stamp Gang Candy Cane Red Gold embossing powder
Ranger Holographic embossing powder
Wow Vintage Candy Cane
Wow Metallic Gold Rich Superfine
DCWV Foiled cardstock stack
Vellum
Stick-It sheet adhesive
Glossy Accents

I hope my design has sparked some idea's for you and that you get the time to get creative.  Don't forget to subscribe to my channel so you never miss a new video.  Thanks for spending some time with me today!  See you next time.

Much love and Merry Christmas,
Jasmine

Thursday, November 10, 2016

Handmade Christmas Series: Card 2 Featuring the 2016 SOA Collection

Hello!  Merry Christmas!  Todays project is a fun design with a contemporary edge that's perfect for masculine cards.  Another way I picture this card is in red, black, and gold, which would also be perfect for masculine cards and would look stellar.  In this card we have a watercolored background with heat embossed white puffy stripes, a two-tone, layered stamped tree, stamped and die cut stag and a die cut sentiment.  I had a lot of fun putting this card together and playing with everything in the 2016 Stamp of Approval holiday collection.  Here is the link to the video tutorial I have on my Youtube channel if you want to see start to finish how you can re-create this card at home.  I encourage you to experiment and use my design as a inspiration to create something unique to you or just copy it, lol.  Everything I used is listed below.

Supplies:
Peppermint Stick background by Catherine Pooler Designs
MISTI
Simon Says Stamp White pigment ink
Wow White Puff embossing powder
Simon Says Stamp Mint Candy and High Dive inks
Hip Holiday stamps and dies by Catherine Pooler Designs
Delicata Silvery Shimmer pigment ink
DCWV Twinkle Glints cardstock stack
DCWV Foiled cardstock stack in Gold
Neat&Tangled Happy Holidays die (from 2015 Holiday SOA)
Scor-tape
Tombow Mono Multi liquid glue
3D foam squares
Glue dots

Thank you for stopping by and hanging out with me today!  I hope my project sparked some ideas for you and you have fun creating.  Don't forget to subscribe to my channel so you don't miss out.  See you later!

Much love and Christmas Joy,
Jasmine

Thursday, November 3, 2016

MIO Autumn Breeze Hop


Hey guys!  Welcome to the MIO Autumn Breeze Hop.  You should have arrived here from the talented Deana's blog and if you want to start from the beginning, head to our fearless leader, Laura's blog.  Starting with a piece of watercolor paper that I colored with spray inks by Lindy's Stamp Gang and Dylusions, I die cut a variety of leaves.  On another piece of watercolor paper colored with Colorburst dry watercolor pigments, I stamped my image and heat embossed it in gold.  I arranged the leaves around the stamped panel and completed my card with a die cut sentiment.  This design is perfect for the guys too, especially if they're outdoorsy like mine!

Here's the video tutorial on my Youtube channel if you'd like to see how I created my card from start to finish.  My supply list is below.

Supplies:
Canson 140lb Watercolor Paper
Colorburst Watercolors: Pthalo Green, Alizaron Crimson, and Orange
Lawn Fawn Stitched Leaves dies
Lawn Fawn Stitched Square Stackables die
Janes Doodles Owl stamp set
Versamark
Wow Metallic Gold Superfine embossing powder
MISTI
Scor-tape
ARC Wood Veneer paper
Stick-It
Simon Says Stamp Blessed die
Neenah 110 lb Solar White cardbase

Your next stop on the hop is the lovely Linda's blog and in case you get lost or want to visit one of us again, the complete list is below.


1. Laura
2. Deana Benson
3. Jasmine Burgess - You're here!
4. Linda Gorman
5. Lisa

Can't forget about the prize!

Now all you need to do to enter to win is leave some love at each blog on the hop; how easy is that!?!  The hop runs through 11/17/16 and we'll announce the winner on 11/21/16.  Thanks for stopping by and don't forget to hit the subscribe button on my YouTube channel so you'll be in the know when I post a new project video!

Much love,
Jasmine

Handmade Christmas Series 2018: Day 1 Watercolors and EH Mondo Holly 2 ways

Here's an exciting sale for everyone!  ellenhutson.com is having a 20% off sale on all dies with the code above.  I...